Contents
Final opacity
Bxdfs not only compute the scattering of light, but are also allowed to provide:
- presence (a scalar)
- opacity (a color)
of non-opaque materials. This is done using the RixOpacity interface, that the renderer will query by invoking RixBxdfFactory::BeginOpacity().
Historically (RenderMan RIS 21 and before) presence has been used for masking out parts of an object, while opacity has been used for coloring shadows cast by an object. Depending some ray types (e.g. camera rays), opacity was being ignored, and probabilistic hit-testing was mandatory for presence.
In RenderMan RIS 22, this has been unified, and presence and opacity are now combined into a single property, the final opacity. This final opacity can be used for both probabilistic hit-testing and traditional 'blending' opacity.
However, despite the fact that we are now dealing with a combined final opacity, it can still be helpful to describe the main two usages of this quantity as:
- a 'presence' (actually: scalar final opacity)
- an 'opacity' (actually: colored final opacity)
Note:
- the
RixOpacityAPI still exposes two hooks (for each of the presence/scalar and opacity/colored component of the final opacity), and depending on the instance hint returned by theRixBxdfFactory, and on the ray type, only one of this hook may be called. the shading mode (
RixSCShadingMode) passed toRixBxdfFactory::BeginOpacity()is a hint as to the renderer's intentions for theRixOpacityobject:- if the shading mode is
k_RixSCPresenceQuery, only theRixOpacity::GetPresence()method will be called.RixBxdfFactory::BeginOpacity()need only evaluate the pattern inputs relevant to computing the presence component. - if the shading mode is
k_RixSCOpacityQuery, eitherRixOpacity::GetPresence(),RixOpacity::GetOpacity()(or both) will be executed on the object, and pattern inputs relevant to both presence and opacity components should be fully evaluated.
- if the shading mode is
Presence (scalar Final Opacity)
Consider the case of trying to render a tree leaf. Rather than model it as a polygon mesh, it's common to represent a leaf as a cheap bilinear patch with an associated mask texture representing the leaf shape. Where the mask is zero, there is no leaf. We use the term presence rather than opacity to capture this use case. The leaf-shaped map is a scalar presence map.
It is important to note that in this usage, presence conceptually has no bearing on light scattering (and vice-versa). Where a material is partially present, its light scattering properties do not change. Instead, this is interpreted as the material scattering less often, with each scatter event being identical to what would happen with a totally present material. Critically, this mean that presence is not a way to model transparent surfaces such as glass, because the light scattering and refractive properties of the glass cannot be modeled by presence alone.
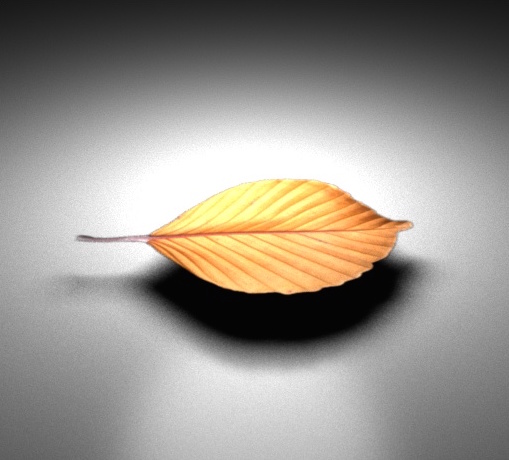
A leaf rendered with PxrDiffuse, using a leaf texture map as input to the presence parameter.
Bxdfs wishing to use a non-trivial presence must do the following:
- implement the
RixBxdfFactory::GetInstanceHints()method and return a bit vector which includes thek_ComputesPresencebit - implement the
RixBxdfFactory::BeginOpacity()method and return aRixOpacityobject that implements theRixOpacity::GetPresence()method
The RixOpacity object is bound to a shading context, similarly to a RixBxdf object. RixOpacity::GetPresence() will typically use this shading context (along with any pattern inputs) to return an array of presence values. There are RixShadingContext::numPts presence values in the array. These presence values need to range from 0 to 1, where:
- 1 is fully present
- 0 is fully absent
- any value in between denotes a probabilistic presence for anti-aliasing
Opacity (colored Final Opacity)
As explained in the Presence section, it would be the responsibility of a semi-translucent thin glass-like bxdf to capture light transport across its surface (instead of using presence). However, when it comes to transmission rays, requiring a similar responsibility is problematic for two reasons:
- Transmission rays do not bend: they are usually fired to compute the amount of light flowing directly along a straight line between two points. Typically, one of these points is on the surface, the other is on the light. This means that any physically plausible object which requires refraction should be opaque to transmission rays.
- Transmission rays typically outnumber camera and indirect rays, so the cost of running a full shader to obtain a transmission value is worth minimizing
Nonetheless, it can be desirable to have a method by which approximate colored shadows can be efficiently produced. These are often preferable to the physically realistic, but noisy, color shadows produced by considering indirect paths. RenderMan allows the bxdf to return an opacity color, to influence the colors of shadow resulting from tracing transmission rays. An opaque object would yield black shadows, as if returning an opacity of [1 1 1].
Note that opacity describes the transmittance straight through the surface (no bending)
Below is an example using opacity to yield colored volumetric shadows. The box encloses both the angel statue and a volume. The only light source is behind the stained glass window (the right wall of the box).
If we were to model the stained glass window as a physically accurate piece of glass, complete with full refraction, then the crepuscular rays (also called "God rays") shining through the volume would be very expensive to render because the only lighting that could be considered for the volume is entirely indirect; the glass would have to be an opaque object and transmission rays from the volume would not reach the light source.
If we instead model the stained glass window as a thin, non-physically accurate piece of glass with colored opacity, then transmission rays from the volume can now directly reach the light (running the opacity shader of the glass window along the way to get a colored contribution). This allows the scene to be rendered with the direct lighting optimization, which allows for a much faster render.
Note that when writing a bxdf for a thin translucent surface, careful consideration should be given as to whether indirect rays should also be fired through the surface. If colored opacity is being used (and depending on the circumstances) it is quite likely that such rays should not be fired, otherwise the lighting contribution will be doubled.
Historically, colored final opacity would only be used for transmission rays, but it is now possible for it to affect camera and indirect rays. Similarly to the explanation above, special care needs to be taken by the bxdf to make sure there is no double contribution.
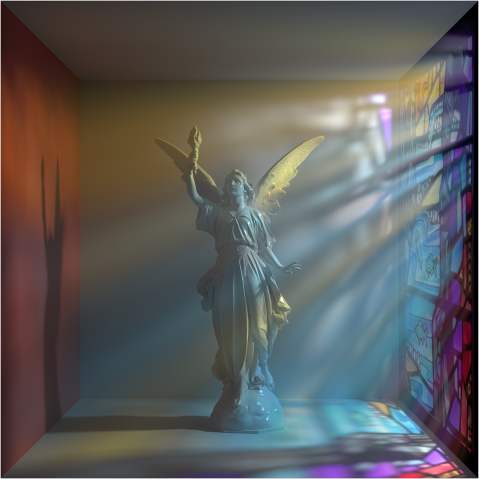
Volumetric crepuscular rays, efficiently rendered using direct lighting by means of stained glass using colored opacity
Bxdfs wishing to use a non-trivial opacity must implement do the following:
- implement the
RixBxdfFactory::GetInstanceHints()method and return a bit vector which includes thek_ComputesOpacitybit - implement the
RixBxdfFactory::BeginOpacity()method and return aRixOpacityobject that implements theRixOpacity::GetOpacity()method
The RixOpacity object is bound to a shading context, similarly to a RixBxdf object. RixOpacity::GetOpacity() will typically use this shading context (along with any pattern inputs) to return an array of opacity values. These opacity values need be colors, ranging from [0 0 0] (black) to [1 1 1] (white), where each channel is:
- 1 is opaque
- 0 is non-opaque
- any value in between will yield colored transmission shadows (the shadow color is 1 - opacity)
Combined presence and opacity
When the RixOpacity API returns both a presence and an opacity value, they are combined (multiplied) together. In this case, one could think of the presence component as the 'intensity' and the opacity component as the 'color'.
Probabilistic hit-testing vs. blend-and-continue
The final opacity can be used in two ways:
- as a probability that the surface is present (historical use of the presence scalar component)
- as a coloring of the light transmitted through the surface (historical use of the opacity color component)
The former would usually use probabilistic hit-testing, where each camera ray would use the (scalar) presence value as a probability to hit the surface, and either result in an actual hit, or a continuation (without a hit). In this case, for each original ray, only one shading event is computed (on the actual hit), although multiple presence evaluations may have happened.
The latter would usually use blending-and-continuation. On hitting a surface with (colored) opacity, shading would be computed, and weighted by (1 - opacity). A continuation ray would then be traced from this hit point (carrying a colored weight equal to opacity), and the process repeats, until hitting a surface with full opacity. In this case, for each original ray, multiple shading events may be computed (and special care needs to be taken to prevent a combinatoric explosion of the number of rays and shading events).
In RenderMan RIS 22, it is possible to use both approaches in all cases, independently of the final opacity being scalar or colored. This means:
- a colored final opacity can be used with probabilistic-hit testing. In this case, additional colored weights are provided through the
RixShadingContextso that the (converged) results are identical to the ones obtained with the blending-and-continuation approach. - a scalar final opacity can be used with blending-and-continuation. In this case, a mono-chromatic value is used for blending, and continuation rays are traced. This would yield results identical to the ones obtained with probabilistic-hit testing, with a lot less noise, at the cost of additional shading computations.
Note that:
- if the final opacity is zero, the renderer will always skip the hit. This means
RixShadingContextshould never yield hits whose (final) opacity is zero. - using blending-and-continuation for indirect rays may yield a combinatoric explosion of rays and shading event
Cached Presence and Opacity
RenderMan offers an additional service that may improve performances for scenes making heavy use of presence/opacity/final opacity (e.g. a forest of trees with presence-mapped leaves).
By having RixBxdfFactory::GetInstanceHints() return a bit vector that includes the k_PresenceCanBeCached bit, the bxdf can request RenderMan to cache presence values. This would prevent re-evaluation of the presence component for every ray that intersects the surface.
By having RixBxdfFactory::GetInstanceHints() return a bit vector that includes the k_OpacityCanBeCached bit, the bxdf can request RenderMan to cache opacity values. This would prevent re-evaluation of the opacity component for every ray that intersects the surface.
However, note that as with most of the caching systems, this may introduce bias, manifesting itself as blurred results due to interpolation from the cached values. Presence and opacity caching efficiency is driven by the opacitycachememory setting – a speed vs memory trade-off. The more memory is allocated to this cache, the more efficient the opacity reuse will be.
It is also important to consider the effect of caching and view-dependent shading signals. It is not possible to meaningfully cache any presence or opacity values when these depend on the viewing direction (e.g. facing ratio). In case it is attempted the caching of a view-dependent signal, the result will not be deterministic, varying on which ray hit will trigger the evaluation of the opacity for a portion of a surface.
[Historical] Presence vs. Bxdf Continuation
When dealing with opaque objects using presence maps, it is usually the case that the objects are either entirely present or not present at all. In practical terms: the presence map is used as a cut-out map, and consists mostly of 0-or-1 values. RenderMan takes advantage of this by combining presence with probabilistic hit-testing, actually interpreting the presence value as the probability that we actually hit a surface.
The compelling advantage of this approach is that for camera rays and indirect rays, the renderer only needs to shade the surface and run the associated bxdf when the surface is actually hit (due to a non-zero presence). This means the renderer doesn't need to institute a policy of automatic continuation rays.
Presence should not be used for cases where the intention is to model a thin semi-transparent surface (rather than an opaque object). Instead, the bxdf should generate a transmitted bxdf sample, with the appropriate properties (transmission color for example). Even if those samples are generated in the exact same direction as the incoming ray, without refraction (i.e. to model a thin translucency), they have to be generated by RixBxdf::GenerateSample(), which means that the presence needs to be 1. Depending on the intention, this transmitted sample may be generated as a continuation sample.