Contents
Because sampling is so crucial to rendering images, RenderMan offers many different modes and settings to control it. Each pixel will normally be sampled multiple times (i.e., super sampling), and the pixels can be sampled in almost any order. The two main considerations are whether to use incremental mode and what settings to use with the adaptive sampler.
There are also three other more minor options that control sampling: bucket order and size, and crop windows. The bucket options control the size of the batches of pixels and the order that they're visited in. The default is to go in swaths from left-to-right and top-to-bottom. The spiral order is a useful alternative when rendering to a framebuffer as it normally shows the center of the image first. Crop windows restrict rendering to the pixels in a portion of the image. This can be useful to focus on a particular region during an interactive render, or to render poster-sized images piece-by-piece.
Incremental Mode
One of the biggest choices for sampling is whether to use incremental or non-incremental mode. In non-incremental mode, the renderer essentially visits each pixel once and computes all of the samples for it in one go. Small batches of pixels are worked on together and several of these batches may be done in parallel on multi-core machines. Nonetheless, when a given pixel is finally displayed it is showing the finished result. This is the traditional rendering mode; if rendered to a framebuffer the image starts out all black and then appears to fill in tile-by-tile until the render is done.
Incremental mode is the other alternative. Here, the renderer goes round-robin and visits every pixel in the image, computing a single sample for each. Then it visits each pixel again and computes a second sample, etc. This goes until it has visited each pixel a sufficient number of times. When displayed to a framebuffer the entire image appears swiftly in a rough and noisy form which then refines bit by bit over time. This allows one to get a quick sense of how the final image will look and to cancel it if it becomes clear that adjustments are needed. However, the total render time may be longer. Also, some renderer settings (e.g., PxrVCM and PxrUnified) may require this mode.
Please note that frames with many AOVs and large resolution may require significantly more memory in incremental mode because RenderMan must keep the entire framebuffer in memory.
Fixed vs. Adaptive Sampling
With respect to the samples within each pixel, the other major choice is fixed vs. adaptive sampling. Of these, fixed sampling is the simpler approach; the renderer is given a maximum number of samples per pixel and it renders until it has computed that many. For incremental mode, this means it's the number of passes that it will take over the image to refine it. Sample numbers that are powers of two may give less image variance than other numbers -- for example, 256 is usually better than 257 or even 280.
The other choice, adaptive sampling, is slightly trickier but may be able to speed up renders significantly. For this method, the render is given a maximum number of samples per pixel, as with fixed sampling, and also a minimum number of samples and variance threshold. Each pixel will be sampled any number of times between these two bounds. As each sample is added to a pixel the renderer looks to see how much the sample changes the pixel. If enough samples are added without changing the pixel much, the renderer stops sampling it. The variance setting controls the threshold for how little subsequent samples change the pixel (i.e., lower values cause more samples and longer renders), while the minimum sample count helps to control the confidence that this threshold has been achieved (i.e., higher values cause more samples). Of these three settings, only the maximum number of samples is required to be given; if unspecified the minimum samples and the variance will have reasonable defaults based on the maximum sample count.
When the pixel variance is greater than zero, adaptive sampling is enabled. If the pixel variance is zero, or if the min samples is set equal to max samples then fixed sampling is enabled. Adaptive sampling is on by default and is the recommended mode.
Relative Pixel Variance
Sometimes you may have a scene which is adequately sampled by the adaptive sampler except for one or two problematic objects that still require more sampling. You could lower the pixel variance setting to cause the adaptive sampler to compute more samples, but this is a global setting that increase the sample counts across the image and make the render take longer. The relative pixel variance is an attribute that you allows you to adjust how the adaptive sampler behaves towards specific objects. It is a scale factor that is multiplied by the scene's pixel variance setting. If an object's relative pixel variance is 0.5, for example, the adaptive sampler will render just that object as though the scene's pixel variance were half of its current value. The default, 1.0, means to use the scene pixel variance as-is. Lowering it towards zero will increase sampling on the object while raising it above one will decrease sampling on the object (e.g., to spend less effort sampling background objects).
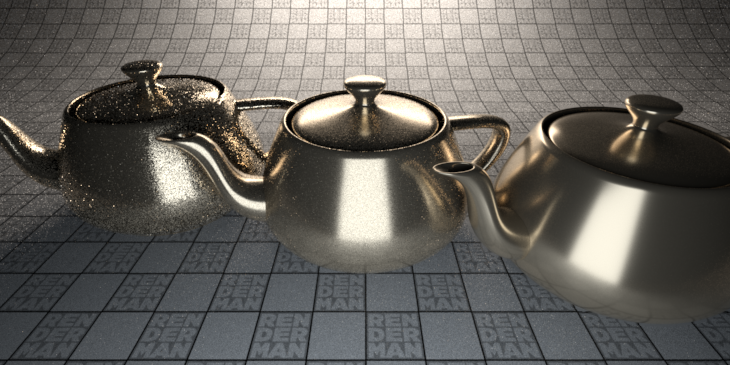
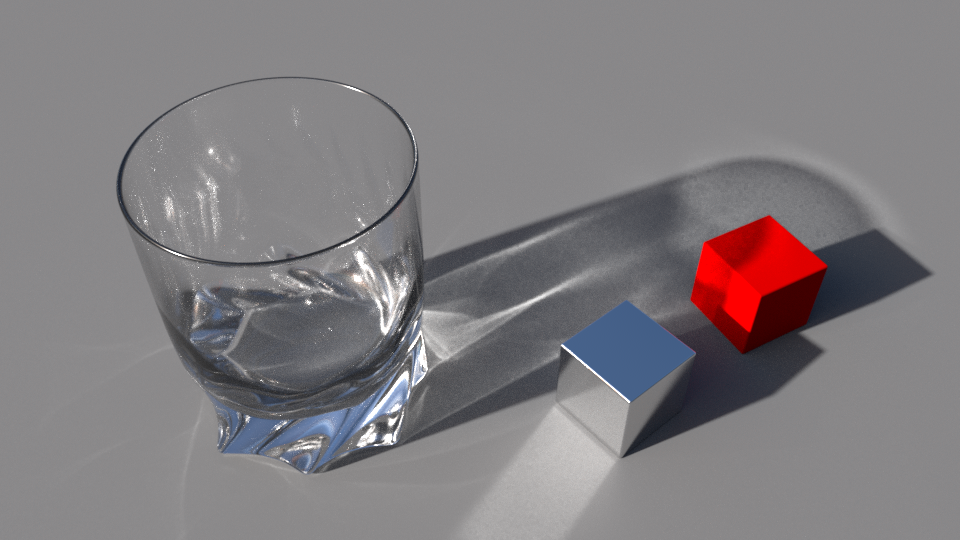
Here is a rendered image along with a heat map of the sample counts to show this. From left-to-right, the three teapots in this image have their relative pixel variance set to 20, 1, and 0, but are otherwise identical. The scene's pixel variance is intentionally set somewhat high to emphasize the difference in noise:

There are some limitations to this, however. If the maximum samples are not set high enough, then lowering the relative pixel variance on undersampled objects may not help much. Another limitation is that this only works on objects directly visible to camera rays; it does not affect the sampling of the shadow cast by the object, nor does it affect the sampling when seen indirectly through reflection or refraction. For these, you would need to adjust the relative pixel variance on the object receiving shadow, or doing the reflection or refraction. Finally, note that an extreme difference in sampling between an object and the background behind it can produce a halo-like effect.
Adaptive Sampling Error Metrics
During adaptive sampling, the renderer has to estimate the error left in each pixel in order to decide which pixels should be sampled more, and which ones can be stopped. (This can only be an estimate since the only way to know the real error would be to render a fully converged image and compare each pixel color with that.) We offer four ways to estimate the error – four "error metrics" (to use a more technical term). One error metric measures the contrast of the samples in the pixel. One measures the variance of the samples in the pixel. All metrics divide the contrast/variance/difference by the number of samples in the pixel. We have found that the variance error metric is best at reliably capturing visible noise; hence we have chosen it as the default setting in RenderMan.
Since each error metric is measuring a different quantity, the "Pixel Variance" parameter has a different meaning for each. For example, to get (very roughly) comparable image quality, the contrast error metric might need pixel variance 0.005, while the variance error metric might need pixel variance 0.015. All these numbers are very scene dependent, but the main point here is that they differ significantly between the error metrics, so keep that in mind if switching between them.
Independent of the error metric chosen, there are also some important perceptual aspects. In ultra-dark regions the relative error can be high (perhaps the pixel intensity so far is 0.0001 but the true intensity is 0.0002), but we would only see that error if we increased the image exposure significantly. In super-saturated pixels we might not care about the noise either – whether the intensity in a pixel is 10 or 20 would only become visible if we reduced the image exposure by more than 3 stops. For mid-range intensities, the standard gamma correction (assuming sRGB and a gamma of 2.2) is applied before the contrast/variance/difference is computed. (In the actual implementation, we multiply the contrast/variance/difference by the gradient of the gamma curve instead of gamma-correcting them; this gives the same overall effect as gamma-correcting the pixels colors before computing the variance.)
As mentioned above, there is a backwards-compatible error metric called "contrast-v22". This is the metric that was used in RenderMan 22 and older: a relative contrast, with the contrast in dark pixels optionally reduced with "darkfalloff". There is also "variance-v22" that uses the variance metrics from RenderMan 22 to match previous renders if needed.

Variance (left) versus Contrast (right) with the same settings. Glass Scene courtesy of Julien Duval.
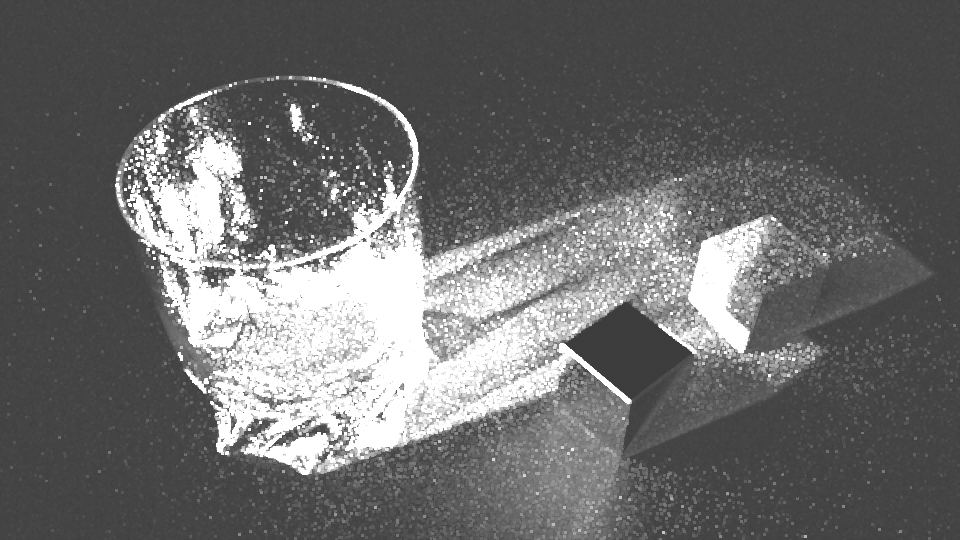
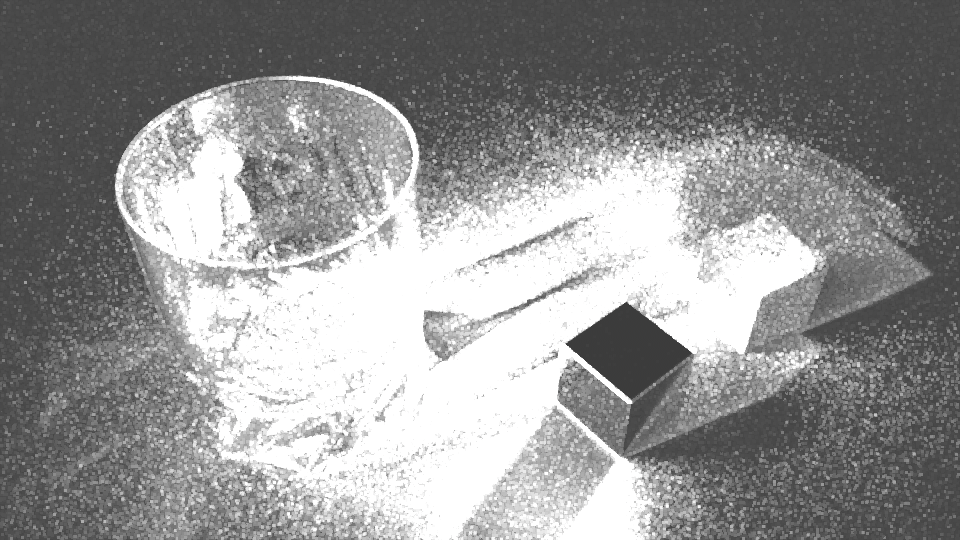
Variance (left) versus Contrast (right) sample distribution visualized
Note the better concentration of samples using the Variance metric. However, more samples were taken and the image took 6 minutes longer. This is why it's recommended to increase the relative pixel variance control for similar render times.
Adaptive Sampling Tips
For more help on image quality, see the documentation on Reducing Noise.
Variance, or noise, receives more samples than surrounding areas with less variance.
This means that your primary control for rendering a clean image is the pixel variance parameter. Lower values improve quality by telling the renderer you want less noise. When RenderMan detects noise it sends more samples. Without lowering the pixel variance, RenderMan doesn't know the user is unhappy with the noise levels. Altering max samples and re-rendering may produce the exact same image and raising min samples defeats the purpose of having an adaptive rendering technique.
Pixel variance values down to 0.01 are very high quality.
You may test what value is acceptable by doing a render region on areas that have the most noise. Lower the value until you're happy. Lower values take longer to render. This is a global control for sampling the image. This is simple and handles all noise given enough time and a pool of samples to use. The default is 0.015 for the variance adaptive sampling metric. Other metrics have different sweet spots for this value. Values as low as 0.005 or below have their uses. 0.0 turns off adaptive sampling.
Pixel variance runs on a continuum from 0 to 1.
When the pixel variance parameter is 0 the renderer will always cast max samples (and adaptive sampling is disabled) per pixel. When the pixel variance is 1, it will only cast the min samples. Intermediate settings will cast a number of samples per pixel that is somewhere in between, but it strongly depends on the degree of noise in the image rather than any strictly linear relation.
What about min/max samples?
Min and max sample values are essentially clamps or boundaries given to RenderMan. Min samples is exactly that: the minimum number to take for every pixel in the image. Max samples is the maximum to take per pixel. These have no effect on how many samples RenderMan may take based on the pixel variance parameter, instead these enforce a minimum and maximum. In general, the primary setting of the two is max samples. By default, min samples is computed from the square root of that value.
Typically we recommend keeping min samples as low as possible. You may increase them on scenes with a lot of tiny features or geometry like fur and hair. This guarantees a certain level of quality before the adaptive sampling takes over.
You may use some high values for max samples but note that if the pixel variance resolves an area before reaching this limit, it will not take any more even if you specified a high max samples value.
When do you increase max samples?
Well, scenes with motion blur or depth of field may need many more samples to actually converge. If your max samples is too low, you end the pixel sampling before it had a chance to converge or finish. For example: If a pixel needs 200 samples to converge but you set max samples to 100, then no matter what you do to pixel variance setting, it won't help as it is forced to stop at 100 samples.
Typically 512 max samples is useful in most cases with depth of field and/or motion blur.
Note that sampling is also tied to filtering which is what provides the final anti-aliasing. We recommend the default of Gaussian 2x2 and don't typically see need to change this. It's an inexpensive filter and with a window of 2x2 it retains sharpness. Sinc filters enhance edges and may cause ringing and artifacts. Essentially they create details where there are none. Consider avoiding these unless you need a large image for print. Be careful of highlights when using those filters.
Experience will help you determine your needs over time and we recommend experimenting with settings on isolated sections of your images. This may help you save time. Also know that when seen in playback, noise isn't always noticeable at lower levels. Avoid over-tuning a scene by using a still image as your only guide. No one is going to pause your film in the theater. Note that visual effects shots may also rely on adding in film-like grain and destroy your hard work at making a perfectly clean image at huge costs to render time. Noise caused by motion blur is typically most forgiving because it's transient over time and space.
The above recommendations are on a global level for controlling your image quality all at once. There are also settings for local sampling (lights, BxDF, volume, and indirect) which may provide more granular control. Do keep Light and material (BxDF) samples the same. Only change them for debugging purposes when writing and testing BxDFs