Contents
Depth of Field (DOF) is a photographic technique used to convey scale (size) and areas of interest in a composition.
Clever usage can lead a viewer to certain parts of your image and increase photorealism by correctly mimicking a real-world lens.

RenderMan provides controls for realistic and compelling images with depth of field. There are also options that are non-physical but great for creating art-directed imagery.
The render cost of depth of field can be high as it generates noise that needs many more samples to converge. But the result can be impressive.
To begin using DOF in Blender, go to the camera data properties ![]() for the camera that you want to to render DOF from, and click the checkbox next to Depth of Field, as shown below.
for the camera that you want to to render DOF from, and click the checkbox next to Depth of Field, as shown below.
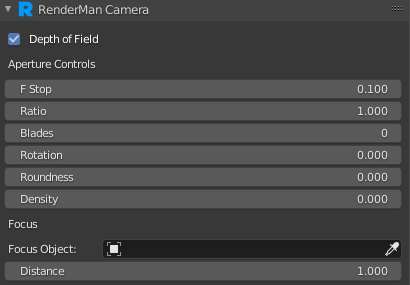
- F Stop: Like a real camera lens, this setting controls the strength of the effect. Lower values increase blur while higher values decrease blur.
- Ratio: Depth of field aspect.
- Blades: This determines the shape of the bokeh effect. If you choose fewer than three sides (triangle) the bokeh will be circular.
- Rotation: This controls the angle where sides meet for non-circular bokeh shapes (Number of Sides is greater than 2).
- Roundness: Values from 0 to 1 make the shape bow or flex outwards making it more rounded. Values from 0 to -1 bow inwards and make for sharper points.
- Density: This controls the brightness across the bokeh shape. 0 to 1 makes it brighter at the outer edge like a catadrioptic lens (look it up, quite interesting). 0 to -1 makes it brighter in the center and falloff towards the edges.
For more information on the various aperture controls, see Bokeh.
Focus
- Distance: The distance to the object or location you want in-focus (sharp) measured in scene grid units. This is referred to as the Focal Plane.
- Focus Object: You can also select an object from the scene to be your distance. RfB will use this value over the value set for Distance.