Contents
The Texture Manager has one simple role: convert images to RenderMan's texture format, using txmake. It handles single images as well as texture atlases (UDIM, Mudbox, ZBrush).
You can add this pane to Houdini by selecting New Tab and choosing RenderMan Texture Manager at the bottom of the list for New Pane Type.
User interface
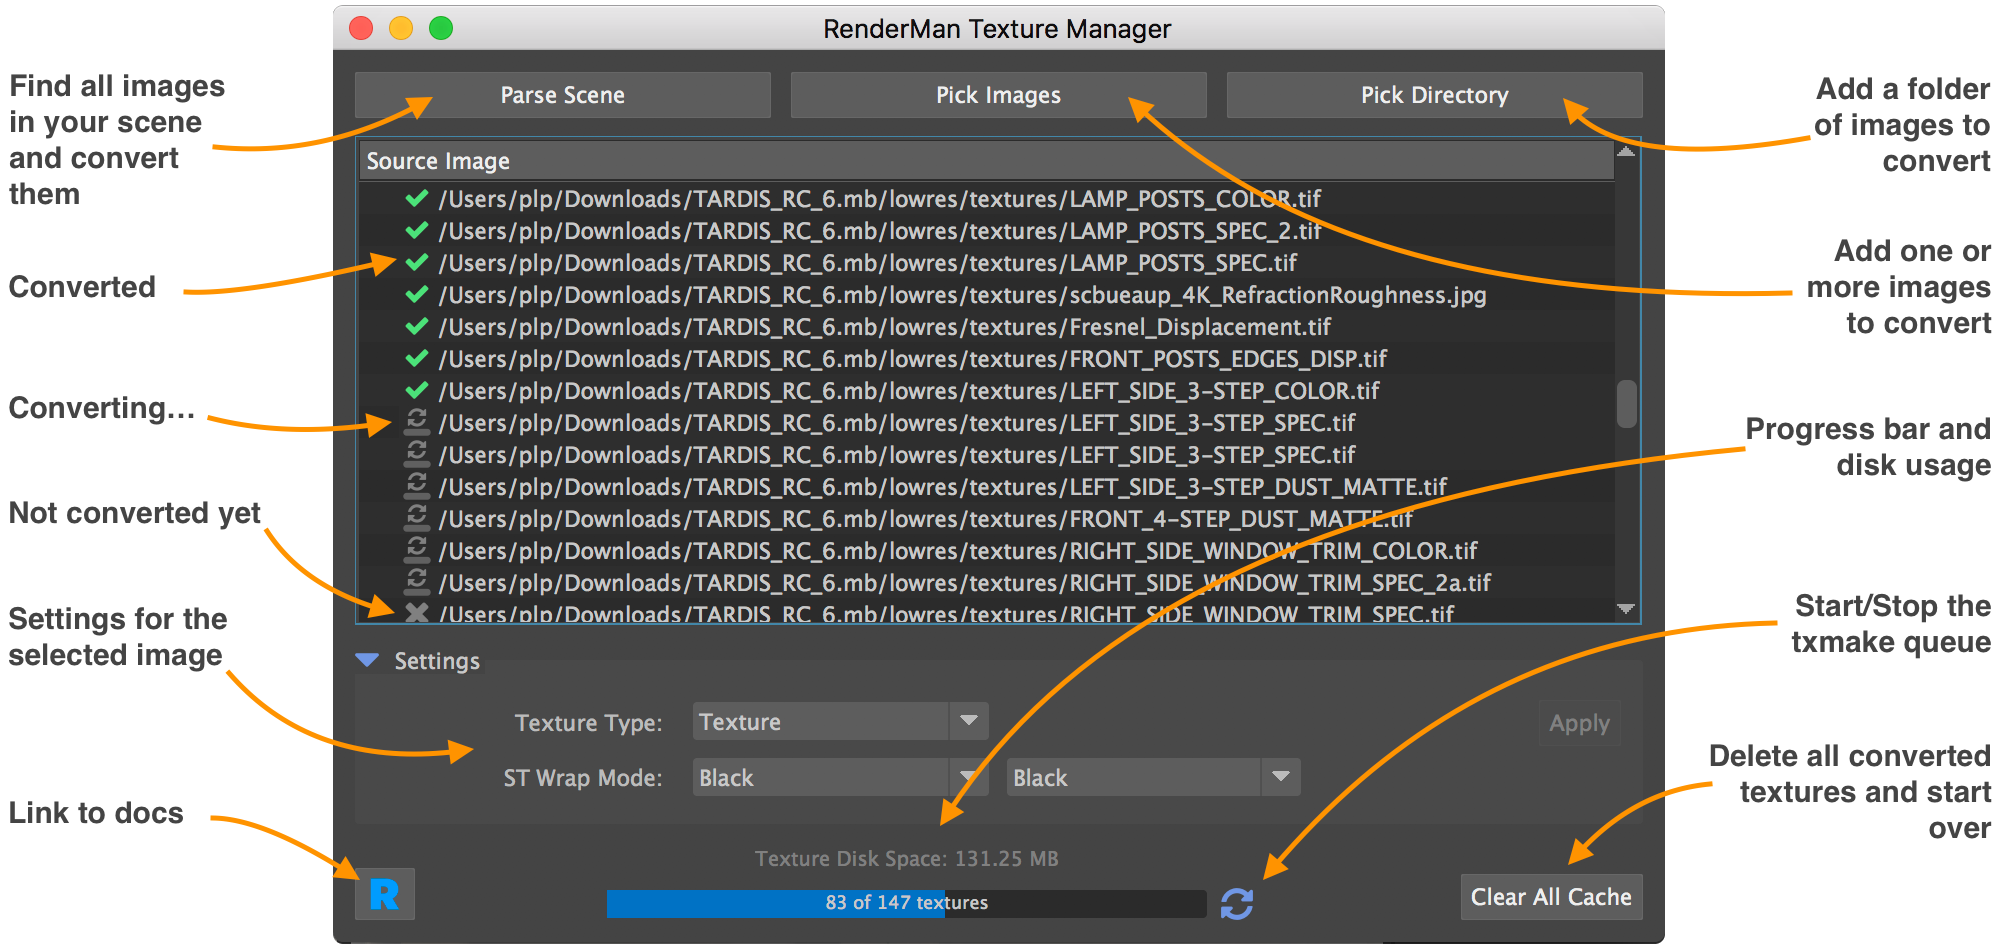
When you open a new scene, the Texture Manager will find all images used as textures and add them to a queue to convert them.
Just press Parse Scene whenever you want new textures to be converted. Pick Image and Pick Directory allow you to pre-convert images without having to know how to use txmake.
Stop / Start the conversion queue
By default, the conversion queue is always running, but sometimes you may want to stop the conversion process.
The conversion queue can be stopped and restarted by clicking on the icon on the right of the progress bar. When the queue is stopped, the running txmake processes are immediately killed but existing textures are intact. When you restart, it pick up where it left.
Conversion informations
There is a disk usage and progress indicator at the bottom of the Texture Manager window.
Each file in the list also has a status icon.
Interactive versus Batch rendering
- During interactive renders, the texture manager will add new textures to the queue and return a temporary texture until the conversion is done. Once done, it will send an update to the renderer and your texture will appear.
- When you start a Batch or a Preview render, you need all your textures to be converted first.
Txmake Configuration
The texture manager uses a set of rules to choose optimal txmake parameters based on:
- The type of node using the texture:
pattern,light,lightfilterorimageplane. - A set of base parameters for that type of node
- one or more rules to modify the base parameters when considering the file's name, the bit depth, etc.
These settings are defined in a $RMANTREE/etc/txmanager_rules.json.
The default rules are build for efficiency and you shouldn't have to modify them unless you have specific pipeline requirements
JSON structure
Here is a very basic example. See $RMANTREE/etc/txmanager_rules.json for the real rules.
{
    "pattern": {
        "args": {
            "texture_type": "regular",
            "smode": "periodic",
            "tmode": "periodic",
            "texture_format": "pixar",
            "texture_filter": "catmull-rom",
            "resize": "up-",
            "data_type": null,
            "compression": "lossless",
            "compression_level": null
        },
        "rules": {
            "'_i8t' in '%(img_name)s'": {
                "args": {
                    "texture_format": "tiff",
                    "data_type": "byte"
                }
            }
		}
	}
}
Category
In the example above, the category is pattern , but there are other pre-defined categories: light , lightfilter and
imageplane.
args
This section is a dictionary representing default txmake parameter values for the current category. The key names (
texture_type, smode, tmode
, etc) are coming from the TxParams class of the txmanager python module.
rules
Here we define a set of rules that will all be executed in the file's order. The key string should evaluate as a python expression and return True once substituted.
There are a number of available substitution tokens:
| token | contents |
|---|---|
node_type | the node type (PxrDiskLight, PxrTexture, etc). |
img_atlas | True if the texture is a UDIM or Mudbox texture set. |
img_name | the image name, without its file extension. |
img_ext | the image's file extension, with its leading dot. |
img_type | the image's data type: int or float |
img_depth | the image's bit depth: 8, 16, 32 |
In the example above, the rule:
"'_i8t' in '%(img_name)s'": {
	"args": {
		"texture_format": "tiff",
		"data_type": "byte"
	}
}
... matches "_i8t" in the image name, which is here interpreted as shorthand for "8 bits integer tiff format" and sets the texture format to "tiff" and the image to "byte" (8 bits integer, see txmake documentation). For example, a file named "roof_top_diffColor_i8t_v06.png" would match that rule.
Of course, you can create more sophisticated tests by using the and and or keywords.
"'%(img_type)s' == 'float' and %(img_depth)d > 16"
The standard rules tend to rely on the node_type, img_type and img_depth to pick the best file format and compression algorithm.