Contents
The primary use of the passes tab is to create additional outputs for your render. These are also known as Arbitrary Output Variables (AOVs).
It is also possible to create additional "passes", which are more akin to Maya's render layers (which are also supported). Passes can each have their own camera and render settings, which act as overrides of global render settings.
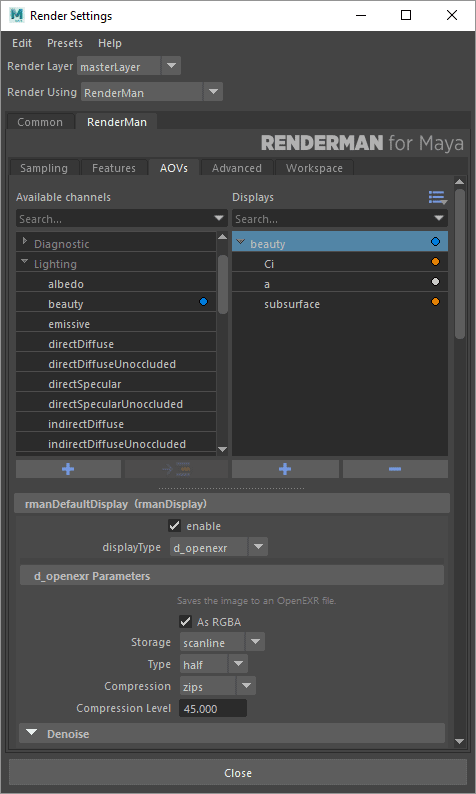
This UI allows you to create Display Channels (AOV selections and LPE sources) and Display Drivers as their destination file (TIFF, OpenEXR, etc). By default, double clicking will add a new Display Channel and Driver from the left-hand menu to the right-hand menu. The left menu contains the preset AOVs and LPE typically used for rendering. These are separated into categories:
- Custom: Input your own custom AOV or LPE
- Standard: This contains most of the built-in AOVs.
- Diagnostic: This contains a subset of the AOVs used for visualizing pixel samples and CPU Time, for example
- Lighting: This is the most common set of LPE used for adjustment in compositing, outputs such as direct diffuse, indirect specular, etc. are found here
- Denoiser: These are the AOVs used by the Denoise utility, selecting the beauty Display Driver and enabling Denoise will denoise the Beauty after a Batch Render.
- Shadow: These are special LPE to collect shadows
- Mattes: These are Matte LPE used in conjunction with PxrMatteID
- Integrator: These are the AOVs that are built into the Integrator and may vary per integrator.
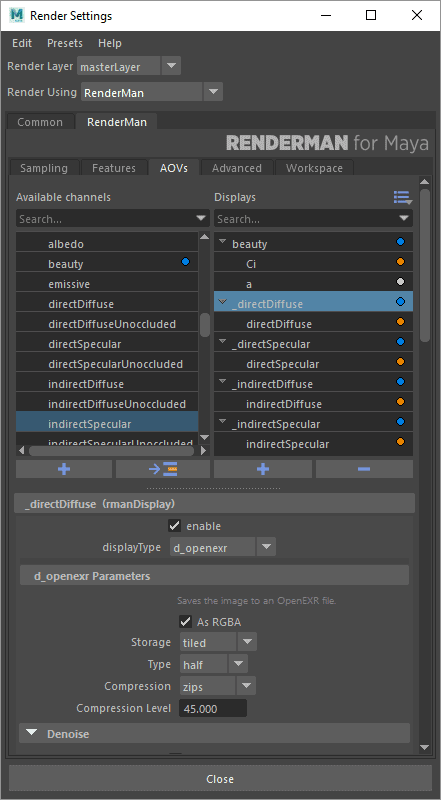
The quick and easy explanation: Choose the Channels on the left you wish to render by double clicking them. This will auto-create a new display driver with the same name to be rendered.
If you want a smaller list or maybe single file output with these channels, be sure and have a Display Driver selected on the right when you add the Channels using the arrow-to-list button on the bottom left of the Channels box.
You must use a file format in the Display Driver that will hold these channels, we recommend leaving the default of OpenEXR nearly 100% of the time. If you do not know what file types you might need, leave it at default.
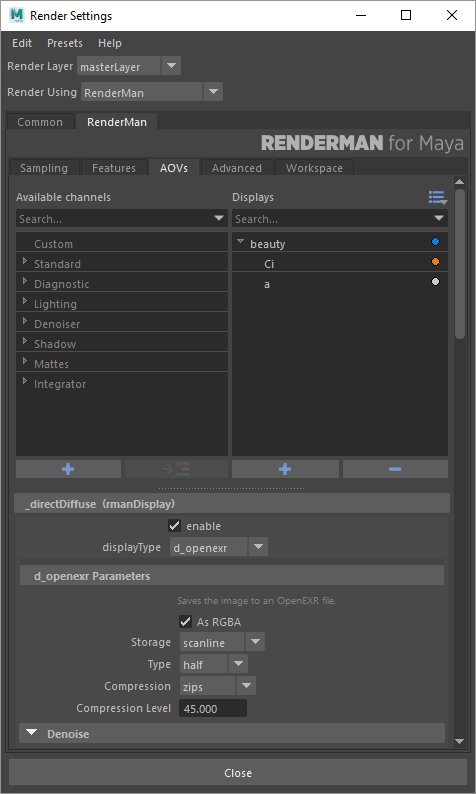
When you first open the AOV tab you are presented with the outputs for the default render pass.
Displays
The Displays tab shows the outputs for the selected pass. They are in the list on the right. The default output of the Final pass is, as you might expect, rgba, the color (Ci) and alpha (a) channels of a typical image. You can add other outputs by selecting from the list of presets in the list on the left and clicking the arrow button between the lists. Custom outputs can also be added by clicking the '+' button at the bottom of the lists.
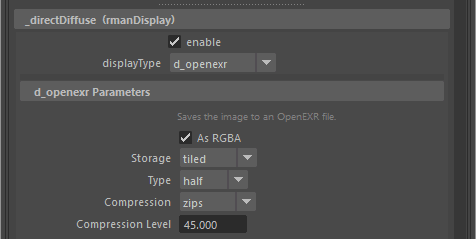
Each output has its own settings which appear below the lists when an item is selected in the list of outputs. Double clicking an existing preset adds it to the list for rendering with the Display Driver listed first (_directDiffuse) and the Display Channel (source, directDiffuse) underneath. Below we start by explaining the options for Display Drivers.
Display Settings
Enable
Allow this output to render
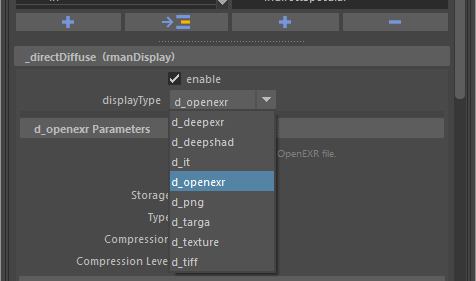
Display Type
Choose the output file format of the Display Driver, including Deep Data (DeepEXR)
OpenEXR
OpenEXR is the most common, versatile, and capable file format for renders. It is the default and recommended file type. Denoise functionality requires OpenEXR or TIFF types.
As RGBA
Orders Channels as RGBA order
Storage
- Tiled: Image is saved in tile formatted blocks of data
- Planar: Is stored as a scanline format
Type
- Half Precision (16-half)
- Float Precision (32-bit float)
Typically Half is good enough for color AOVs and passes. Float is recommended for Data AOVs and passes like Z depth or P. OpenEXR does not support lower bit depths.
Compression
- ZIPS is default and recommended for compositing workflow as it is stored as a single scanline
- ZIP is also useful but slightly slower in compositing packages at bundles of 16 scanlines
- You can find out more about the less common choices on the Wiki page for OpenEXR
Compression Level
How much the data is compacted, for lossy schemes (such as DWAA) this may degrade final images
'it'
This is designed for rendering to 'it' as the display device, there are no options.
DeepEXR
DeepEXR is the common format used to store deep data, or per-sample data used to composite objects at depth such as nesting objects in Volumes
Storage
- Tiled: Image is saved in tile formatted blocks of data
- Planar: Is stored as a scanline format
Type
- Half Precision (16-half)
- Float Precision (32-bit float)
Typically Half is good enough for color AOVs and passes. Float is recommended for Data AOVs and passes like Z depth or P
Compression
We handle merging samples internally and automatically to provide the best balance between size and correctness, as such the options below are what is available to control final size of the output frames.
- ZIPS is default and recommended for compositing workflow as it is stored as a single scanline
- ZIP is also useful but slightly slower in compositing packages at bundles of 16 scanlines
- You can find out more about the less common choices on the Wiki page for OpenEXR
PNG
PNGs are a common web format that include an Alpha channel for transparency
Quantize
This option attempts to compress the color scheme to shrink the file size
Targa
Targas are a popular 8-bit (per channel) file format
Quantize
This option attempts to compress the color scheme to shrink the file size
Texture
This renders to the RenderMan .tex format directly from the renderer.
The image resolution used for this is expected to have power of two dimensions and must be set by the user. An example would be 512 x 512 (where 512 is a power of two and square)
Texture Format
- Pixar: Typically the best performance
- OpenEXR: Saved as an OpenEXR format
- Tiff: Saved as the TIFF format (Note that this format cannot save files larger than 4GB)
Bit Depth
Set the bit depth for the output file, does not apply to OpenEXR
- Byte: Small files
- Short: Small files, more data than Byte
- Float: Large files, full precision
EXR Bit Depth
- Half Precision (16-half)
- Float Precision (32-bit float)
S and T Wrap Modes
- black: Useful for tile based workflows such as UDIM.
- clamp: Useful non-periodic texturing access.
- periodic: Useful for periodic (repeating) texture access.
Compression
- None: No compression is performed
- Lossless: Compression performed but without losing precision
- Lossy: Compressed and further shrunk by removing details
EXR Compression
We handle merging samples internally and automatically to provide the best balance between size and correctness, as such the options below are what is available to control final size of the output frames.
- ZIPS is default and recommended for compositing workflow as it is stored as a single scanline
- ZIP is also useful but slightly slower in compositing packages at bundles of 16 scanlines
- You can find out more about the less common choices on the Wiki page for OpenEXR
EXR Compression Level
How much the data is compacted, for lossy schemes (such as DWAA) this may degrade final images
Tiff
Tiffs are a popular formats that can also store floating point precision images as well as pass data
Format
- uint8: 8-bit storage. Small file sizes typically not suitable for post compositing work.
- uint16: 16-bit integer storage. Small file sizes with better reproduction than the 8-bit counterpart
- float32: Full 32-bit float images. Larger file sizes but best suited to working with in post compositing
Quantize
This option attempts to compress the color scheme to shrink the file size
Compression
- None: no compression is performed, the file is full size and lossless
- LZW: a very common lossless compression found in TIFF files.
- Packbits (RLE): fast lossless compression, less compression than LZW
- Deflate: Common lossless compression scheme
- Pixarlog: Often a good choice for compressing HDR images without losing highlight data
Resolution Unit
Select between inches and centimeters or none. This is similar to telling Maya your resolution per (unit)
Resolution
The number of pixels per Resolution Unit (above) in the ImageWidth and ImageHeight direction.
Denoise
Enable denoising for this chosen Display
Mode
- Single Frame is for a still render
- Cross-frame is for an animation or series of frames
Remap
This is described in our Filtering documentation
- Break Point: A value below which the color is unchanged, must be non-negative (a)
- Max Value: The max value contained, at 0 all remapping is off. This cannot be less than the Break Point value. (b)
- Smoothness: A tweak to the second derivative at the breakpoint (the function is C(1) unless a==b , so you don't get to specify the first derivative. If this parameter is 1, the function is C(2). Smaller values make it flatter, larger ones make it less flat. If it is bigger than ~2.5, the curve has an inflection point - it curves up on the right of the breakpoint. It is illegal to set c <= 0, and it is not recommended to set it to anything other than 1. The default value is 0.
Display Channels
The Display Channels are the sources used for the display drivers above. Typically when adding new AOVs, double clicking adds a new AOV along with a display driver. This means your AOVs will be split to different outputs.
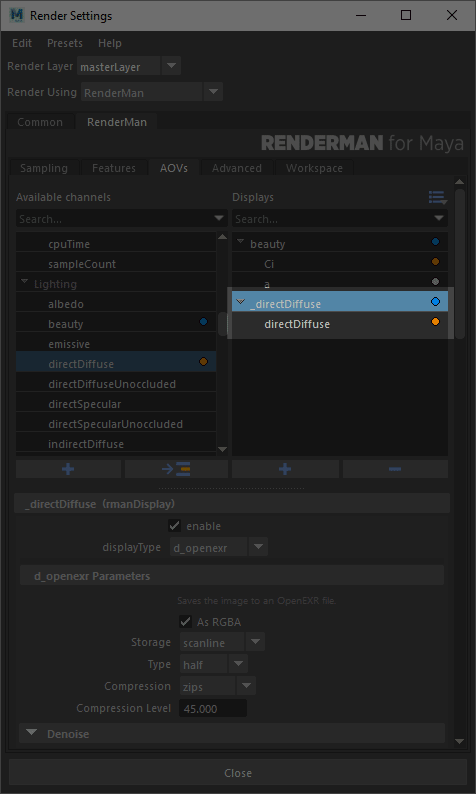
If you wanted them to be written into a single file (or fewer files) then have a display driver selected on the right when adding a new AOV and it will be added to the existing output. Below left is the default behavior of a new display driver, the right is if you have an existing driver selected when adding a display channel. You can use a different display driver.
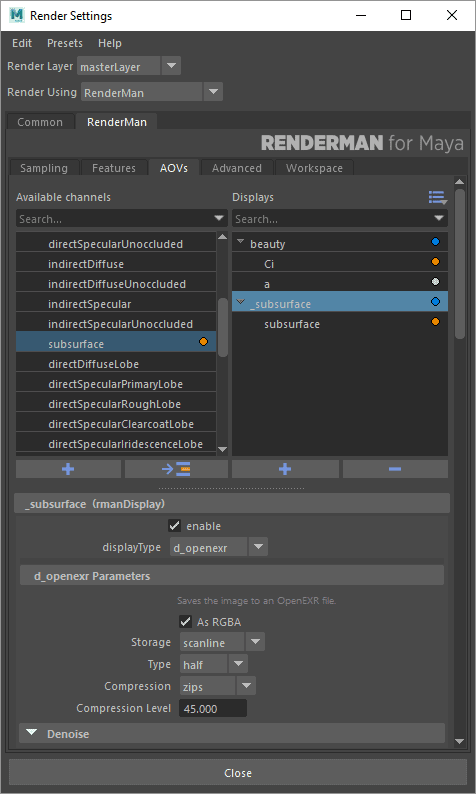
Once you've added a display channel, you can take a look at its settings
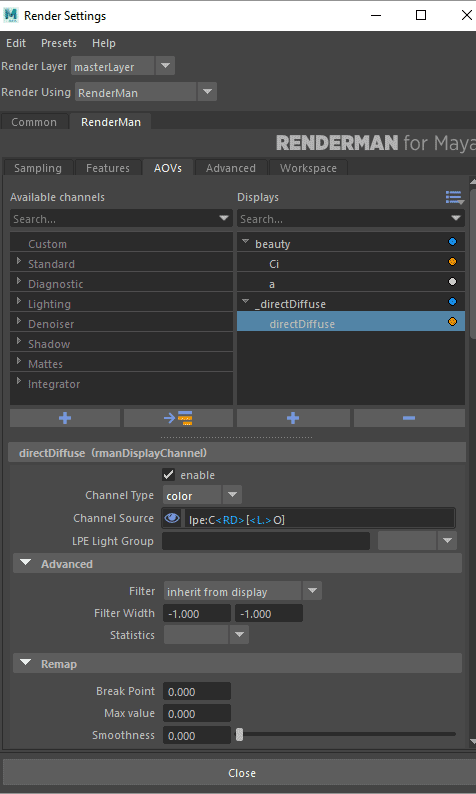
Display Channel Settings
Enable
Sets the channel as renderable or not.
Channel Type
Types used for data are usually stored as a floating point capable formats such as OpenEXR or Float Tiff
- Color
- Float
- Vector
- Normal
- Point
Channel Source
This is the source of the AOV, typically where one would specify an LPE for rendering.
LPE Light Group
You can manually specify a light group here to match the ones you've assigned to lights or select from existing light groups you have already specific in lights using the dropdown menu. This allows for per-light (group) LPE output.
You may need to close the render settings and/or add a new LPE if you added new light groups to lights while the UI was open, this will force it to repopulate the groups from your scene into the menu choices.
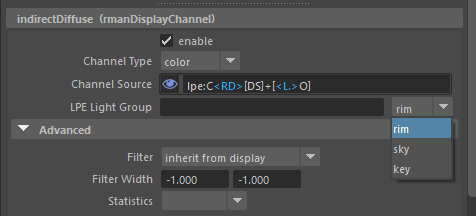
Filter
You can use this section to override the specified filter. For most color data the inherited filter is best to match the other AOVs, but for data, you may wish to use one of the listed min, max, zmin, zmax, etc filters to avoid filtering across object edges.
Filter Width
Here you can change the filter width for this channel. Note that using a different width may mean they will not line up or match the other AOVs.
Statistics
These options are not meant for artists specifically, they are useful options for pipeline considerations or possibly denoise applications outside the renderer and their usage is not required. They are exposed as useful tools for the pipeline so that you do not have to alter RIB files directly.
Variance: Estimates the statistical variance of values contributing to the pixel in associated source channel.
MSE: Like variance, but diminishes towards zero as the number of samples increases. Though somewhat noisy itself, this can provide an estimate for the amount of mean-squared-error versus a hypothetical ground-truth image.
- Even: This renders the even numbered samples to this AOV
- Odd: This renders the odd number of samples to this AOV
Remap
This is described in our Filtering documentation
- Break Point: A value below which the color is unchanged, must be non-negative (a)
- Max Value: The max value contained, at 0 all remapping is off. This cannot be less than the Break Point value. (b)
- Smoothness: A tweak to the second derivative at the breakpoint (the function is C(1) unless a==b, so you don't get to specify the first derivative. If this parameter is 1, the function is C(2). Smaller values make it flatter, larger ones make it less flat. If it is bigger than ~2.5, the curve has an inflection point - it curves up on the right of the breakpoint. It is illegal to set c <= 0, and it is not recommended to set it to anything other than 1. The default value is 0.