...
Saving/Exporting a material is easy!
- Select the PxrMaterialBuilder Node (the export will recognize connected nodes) Be sure there's a (single) BxDF inside the Material Builder or we don't know what to save/render.
- Choose the category you want from the Preset Browser
- Choose the Save icon (the material ball+ icon underneath the preview image)
Tip For convenience, you can also drag and drop the PxrMaterialBuilder to save the asset. Select the node, click and hold the left mouse button, drag the node onto the Preset Browser tab, and let go of the mouse button.
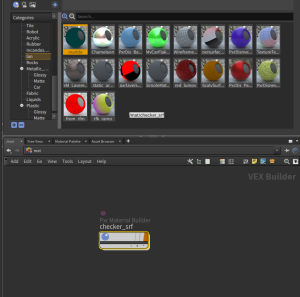
- Give it a useful name and any desired metadata for your pipeline
- RenderMan will generate a preview swatch render, this will auto-populate in the Preset Browser
- Importing/Using a saved asset
- Simply right-click and choose "Import and Assign" to a selected object
- Make any adjustments for your object as needed!
Light Rigs
- Saving/Exporting a light rig is as easy as materials!
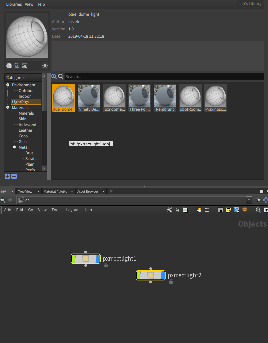
- Make sure that the LighRigs category is selected.
- Select the light nodes that you want to go into the light rig asset.
- Click the Save icon (the light bulb icon underneath the preview image)
Give it a useful name and any desired metadata for your pipeline
Tip The same as materials, you can also drag and drop your light nodes onto the Preset Browser tab to create light rigs.
Importing/Using a saved light rig
- Simply right-click and choose "Import" to import the light rig into your scene
- The Preset Browser will import all the lights in the light rig under one subnet node.
Environment Maps
- You can save an Environment Map using the image icon+ underneath the large preview swatch in the Preset Browser
- Select the Environment category in the Preset Browser
- Choose the desired OpenEXR or .HDR file from the file browser window
- You can add/change metadata in the dialog or change the name.
- Then we convert the image to a compatible .tex format. This may take time depending on the original image size.
- A preview render is then performed and automatically populated in the browser category.
- Using a saved map is easy.
- Select a PxrDomeLight object node.
- Right-click the asset and import.
Changing the map is as easy as double-clicking another environment map asset!
Note If a PxrDomeLight object node is not selected when importing a map, the Preset Browser will automatically create one for you.
Asset Dependencies
When an asset is saved to disk, all its dependencies are saved to disk too.
...