| Table of Contents |
|---|
| Before After Image Slider | ||
|---|---|---|
|
...
|
...
|
96 samples per pixel, before and after denoising
...
Basic Filtering
Using Maya
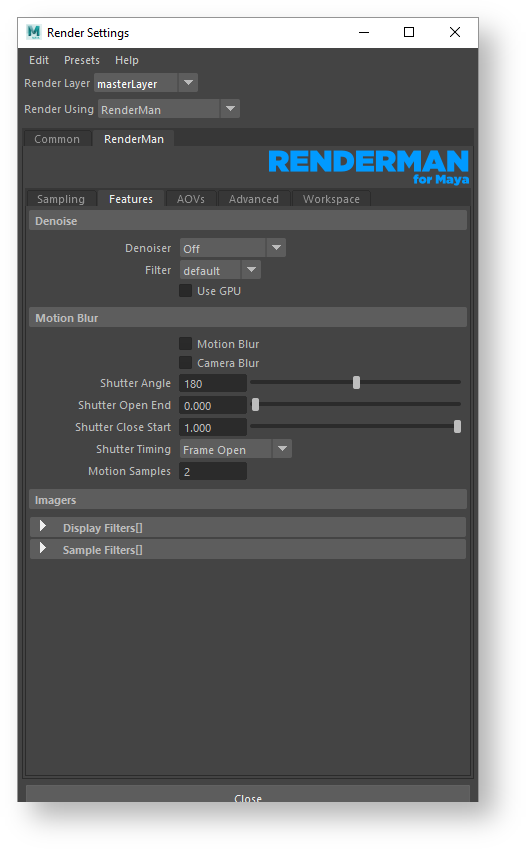
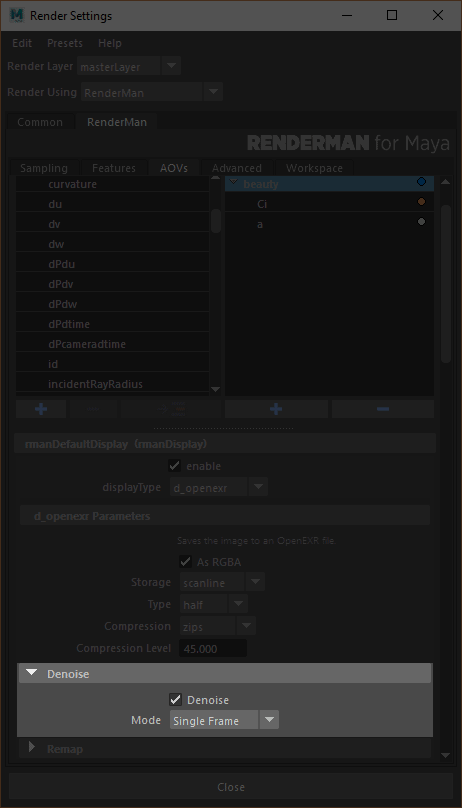
Using the denoising tool from RfM is fairly straightforward. The Sampling AOVs tab under Render Settings now contains a drop-down for each display driver from which you can select Frame or Cross-frame filtering. Choose Frame and RfM will automatically apply the settings needed to produce a denoisable image. This will execute the tool as a post-process and removes noise through statistical filtering on specially configured EXR images.
...
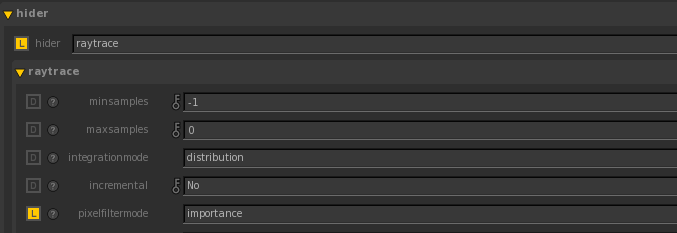
Prman Globals Settings
Turn on importance sampling for the raytrace hider's pixel filter mode. This will eliminate splotchiness in the render.
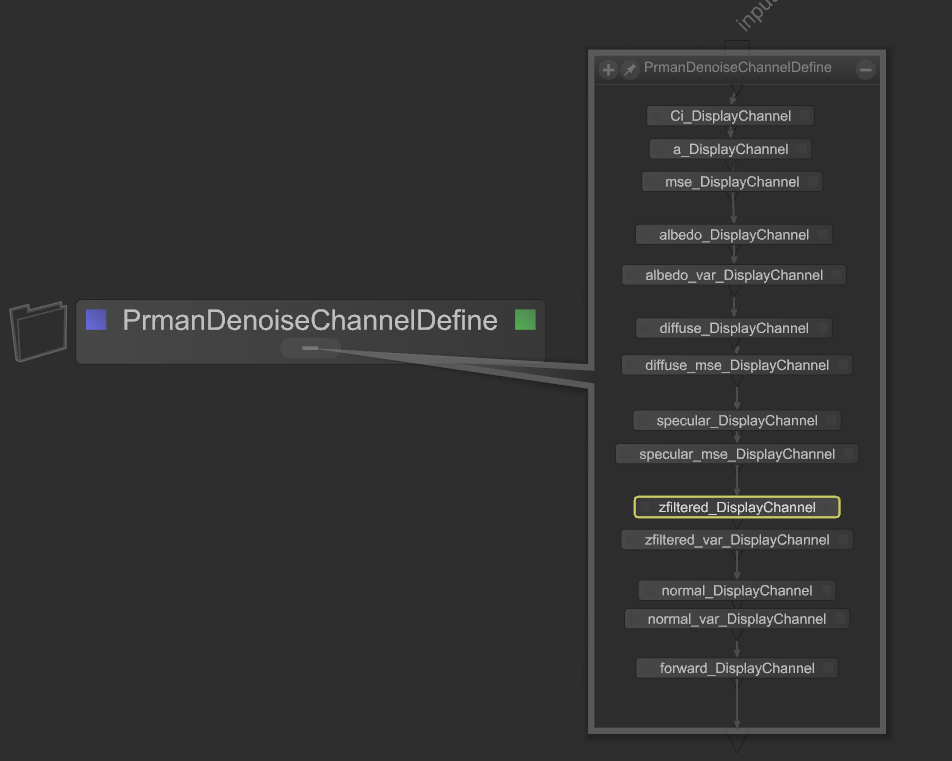
PrmanDenoiseChannelDefine
Create a PrmanDenoiseChannelDefine node which is a macro for creating all the specific DisplayChannels required for the denoise utility.
PrmanDenoiseRenderOutputDefine
Create a PrmanDenoiseRenderOutputDefine node which is a macro for rendering a multichannel OpenEXR file for the beauty pass combined with the AOVs.
Note Be sure the Type is set to raw
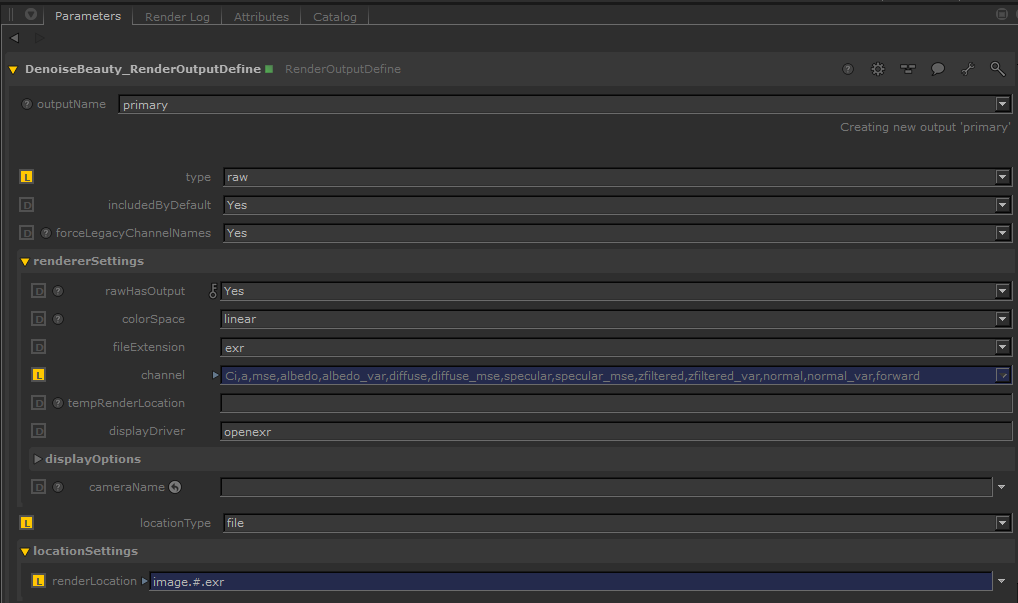
Info If your pipeline does not support multichannel EXR, you can use $RMANTREE/bin/exrmergeto combine the AOVs into a multichannel EXR. Then use this merged multichannel EXR for the denoise utility. Note that each AOV's type should be set to "raw" because this preserves the channel name in the EXR which the denoise utility will look for. Combined EXR using Katana's RenderOutputDefine's merge will not work with the denoise utility.Running Denoise Via RenderOutputDefine Script (Single Frame)
Create a RenderOutDefine. Wire this node to the previous RenderOutputDefine node. Select script for the type, select primary for the scriptInput, and set the scriptCommand to the following:
Code Block $RMANTREE/bin/denoise $INPUT
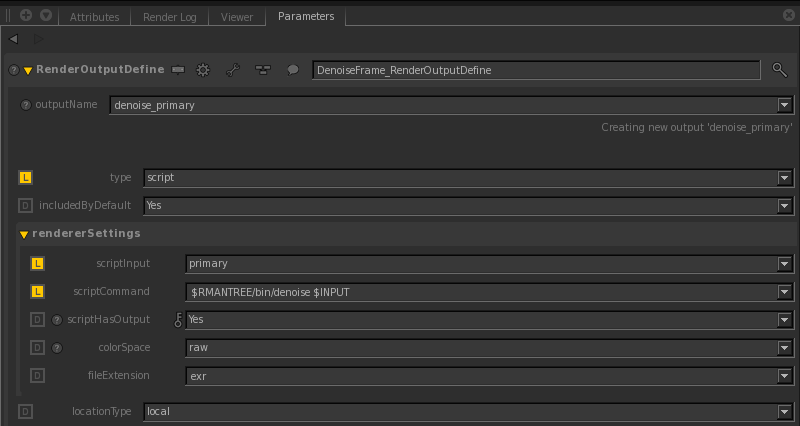
By default, it will write out
<image>_filtered.exr. This can be changed by specifying-o. Rundenoise -helpfor more information on other denoise utility options.
Users must run a disk render in order to denoise an image. Denoising is not currently supported in interactive rendering. Note that we can also run the denoise utility for AOVs; see Layered Filtering below for more information.
...
Required Channels
Setting up a scene in RIB for denoising is more involved if you are doing it manually, but most of the work is in adding the correct DisplayChannel lines to the prologue. Here is the basic snippet that you will need:
| Code Block |
|---|
# Beauty... DisplayChannel "color Ci" DisplayChannel "float a" DisplayChannel "color mse" "string source" "color Ci" "string statistics" "mse" # Shading... DisplayChannel "color albedo" "string source" "color lpe:nothruput;noinfinitecheck;noclamp;unoccluded;overwrite;C(U2L)|O" DisplayChannel "color albedo_var" "string source" "color lpe:nothruput;noinfinitecheck;noclamp;unoccluded;overwrite;C<.S'passthru'>*(C(U2L)|O)" "string statistics" "variance" DisplayChannel "color diffuse" "string source" "color lpe:C(D[DS]*[LO])|O" DisplayChannel "color diffuse_mse" "string source" "color lpe:C(D[DS]*[LO])|O" "string statistics" "mse" DisplayChannel "color specular" "string source" "color lpe:CS[DS]*[LO]" DisplayChannel "color specular_mse" "string source" "color lpe:CS[DS]*[LO]" "string statistics" "mse" # Geometry... DisplayChannel "float zzfiltered" DisplayChannel "float zfiltered_var" "string source" "float zzfiltered" "string filterstatistics" "gaussianvariance" DisplayChannel "floatnormal z_varnormal" "string source" "float z" "string filter" "gaussian" "string statistics" "variance" DisplayChannel "normal normal" "string source" "normal Nn" DisplayChannel "normal normal_var" "string source" "normal Nn" "string statistics" "variance" DisplayChannel "vector forward" "string source" "vector motionFore" DisplayChannel "vector backward" "string source" "vector motionBack" Display "image.exr" "openexr" "Ci,a,mse,albedo,albedo_var,diffuse,diffuse_mse,specular,specular_mse,zzfiltered,zzfiltered_var,normal,normal_var,forward,backward" "int asrgba" 1 Hider "raytrace" "string pixelfiltermode" "importance" # ... |
| Note |
|---|
We mention use of "normal Nn", however for hair we recommend substituting Tn "Hair Tangent" for the best results of Denoising hair. |
In the above example we include "vector forward" and "vector backward" for completeness. These are only used (one or the other or both) for cross-frame denoising but not for a single frame. If only one exists, the Denoiser assumes the opposite vector for the missing direction. If neither exists, it will still operate but in a limited capacity.
...
By default, it will write out <image>_filtered.#.exr. This can be changed by specifying -o. See denoise -help for more information on other denoise command options. Note that we can also run the denoise utility for AOVs with crossframe; see Layered Filtering below.
From RIB
If rendering straight from RIB, configure each frame the same as you would for basic rendering as above. For best results you will want to make sure that the motion vectors, forward and backward, are included this time. Then run the denoise utility with:
...
| Code Block |
|---|
'$RMANTREE/bin/denoise  --crossframe '
    +' image_variance.'+str(int(frame)-1)+'.exr'
    +' image_variance.'+str(int(frame))+'.exr'
    +' image_variance.'+str(int(frame)+1)+'.exr'
    +' diffuse_key.'+str(int(frame)-1)+'.exr'
    +' diffuse_key.'+str(int(frame))+'.exr'
+' diffuse_key.'+str(int(frame)+1)+'.exr' |
From RIB
Single Frame
| Code Block |
|---|
denoise master_variance.exr light0_dir.exr light1_indi.exr |
...