...
| Info |
|---|
Hand-authoring LPE can be a tedious process and for artists it's not always desired to do these manually. This document aims to improve the artist's understanding and usage of LPE. Understanding these concepts and applying them will make you a hero to many pipelines given the power and flexibility of the feature. |
| Table of Contents |
|---|
In production it often becomes necessary to create non-physical effects and art-directed changes to your shot. Light Path Expressions (LPE) are a powerful way to collect and output specific light paths for alteration later.
...
| Info |
|---|
An excellent primer with useful visuals can be found in a tutorial video from Lollipop Shaders. Begin at Class 6 for the LPE introduction. |
...
| Carousel Image Slider | ||||||||||||||||||
|---|---|---|---|---|---|---|---|---|---|---|---|---|---|---|---|---|---|---|
|
| Code Block |
|---|
Diffuse Reflection: lpe:C<RD>*[<L.>O] Specular Reflection: lpe:C<RS>*[<L.>O] |
...
| Carousel Image Slider | ||||||||||||||||||
|---|---|---|---|---|---|---|---|---|---|---|---|---|---|---|---|---|---|---|
|
| Code Block |
|---|
Diffuse Transmission: lpe:C<TD>*[<L.>O] Specular Transmission: lpe:C<TS>*[<L.>O] |
...
| Carousel Image Slider | ||||||||||||||||||
|---|---|---|---|---|---|---|---|---|---|---|---|---|---|---|---|---|---|---|
|
A specular scene using iridescence and transmission (glass).
| Carousel Image Slider | ||||||||||||||||||
|---|---|---|---|---|---|---|---|---|---|---|---|---|---|---|---|---|---|---|
|
Now that we have some understanding of the main components, let's begin by looking at the parts used to organize an LPE
...
| Carousel Image Slider | ||||||||||||||||||
|---|---|---|---|---|---|---|---|---|---|---|---|---|---|---|---|---|---|---|
|
The curly brackets can also take a range of values to render a set of bounces. Maybe you're only interested in collecting the effects of the 4th through 8th bounce? Or maybe you know where to begin or end but want the renderer to decide where that is.
...
| Carousel Image Slider | ||||||||||||||||||
|---|---|---|---|---|---|---|---|---|---|---|---|---|---|---|---|---|---|---|
|
The Beauty Render
...
Now you can output whatever you need based on light groups!
Per Object LPE
You can also render specific objects and effects. This is similar to the light groups but this is often found on a transform of an object, this LPE group tags these objects or collections for separation.
Imagine you have a particular thing you're trying to capture, you can do that with an LPE. You notice that in all the LPE we've been writing it looks like it can be done in 3 parts:
| Code Block |
|---|
[What I'm Rendering] [Light Bounce Paths] [Lights I'm Using] |
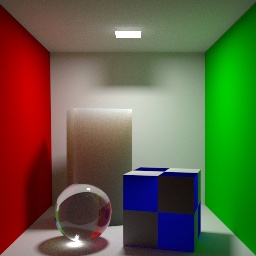
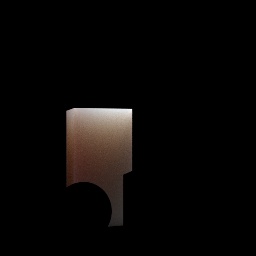
So now let's render something specific. In the Cornell Box example we have a tall subsurface scatter rectangle in the back. I'll render it by itself.
| Code Block |
|---|
lpe:C<[RT][DS]'scatterCube'>.*[<L.>O]


Shorthand
lpe:C<..'scatterCube'>.*[<L.>O] |
What I'm rendering is the tall rectangle and all the light that lands on it.
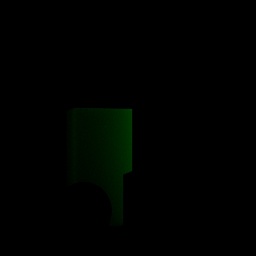
Now, let's render it and only the influence of light off the green wall to the right.
| Code Block |
|---|
lpe:C<[RT][DS]'scatterCube'>+<[RT][DS]'rightWall'>[<L.>O]


Shorthand
lpe:C<..'scatterCube'>+<..'rightWall'>[<L.>O] |
So we're rendering the same cube but this time the light path has to exclusively include all the light bouncing off of and through the rightWall object. So our result is a very green object since we captured just the green wall's bounce light. You can see now how to separate light paths to get what you need to adjust for later compositing. I'm rendering the tall rectangle and all the light that lands on it after leaving the green wall.
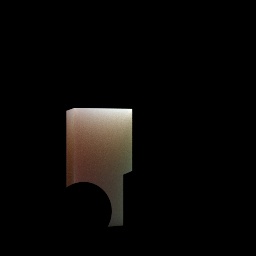
Of course I can also exclude just the green wall. Maybe the green wall is generating noise, I can avoid those light paths by using the caret and a simple tweak of my LPE
| Code Block |
|---|
lpe:C<[RT][DS]'scatterCube'>+<[RT][DS][^'rightWall']>[<L.>O]


Shorthand
lpe:C<..'scatterCube'>+<..[^'rightWall']>[<L.>O] |
The Importance of Naming
Naming your channels is important not just for pipeline reasons and readability, but because the Denoiser utility requires that you follow a naming convention in order to be denoised. Since the tool isn't psychic, it needs a hint as to what is inside the framebuffer/AOV and it uses the name to decide this. There are two main ways the Denoiser filters results, and the way triggered by a "diffuse" keyword is that the albedo is divided out before denoising happens, this is done to prevent texture smearing. So when naming your AOVs, keep that in mind knowing that you'll most likely want your results to be denoised. Below are the acceptable prefixes given again.
The pass images can be named anything else, but must have color channels named/prefixed as one of:
diffusespeculardirectdiffusedirectspeculardirectDiffusedirectSpecularindirectdiffuseindirectspecularindirectDiffuseindirectSpecular
LPE Prefixes Explained
You may see other areas where another prefix is added to the LPE. This is typically for special handling and data.
unoccluded– returns unoccluded or unshadowed result. Using this before your LPE will result in no shadowing.noclamp– returns unclamped result.nothruput– does not apply thruput (throughput is the accumulative albedo of the objects hit by rays). Your results could be attenuated based on throughput of the light path. Using this means the full value is retained, useful for masks.shadows– returns collected shadows. This relies on the shadow sample filters and additional buffers from the Holdout Workflow.holdouts – returns only holdout light paths (light paths with one or more holdout events)overwrite– instead of outputting the accumulated result, overwrite it. One example of using this is for the albedo output where we do not want an accumulated result. Otherwise your values may continue to accumulate light and be incorrect, for example, a pure red of 1,0,0 can become 6,0,0 and be incorrect.noinfinitecheck– do not do any infinite check.
User Lobes
By default you've been seeing us use Diffuse and Specular lobes, but a User lobe can be built into a material for data purposes. These lobes are evaluated with the material but not output to a beauty as a lighting result. These lobes must be specified in an LPE to work, shorthand assumes only Diffuse or Specular substitutions. A useful example are the User Color and Position lobes of PxrSurface.