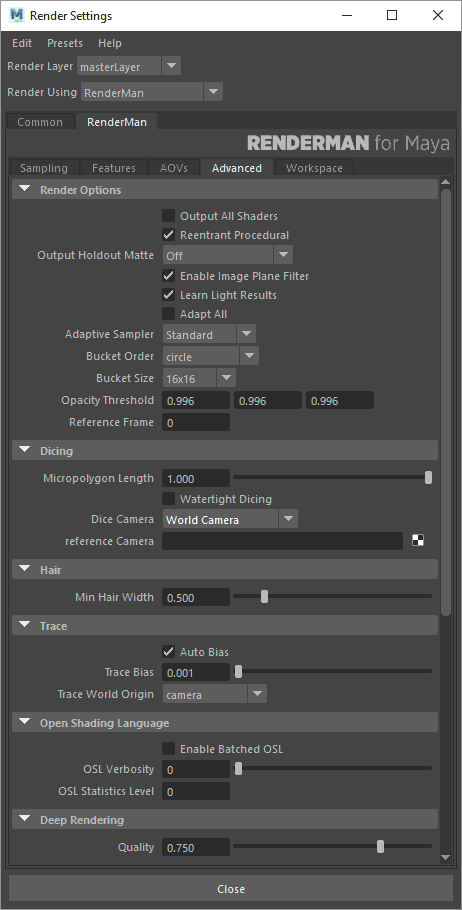
Many of the settings in the Advanced Tab you will never need to edit. However, for the more advanced user who wants fine tuned control over RenderMan for Maya, they are here.
Render Options
Enable Object Instancing: Instanced Maya DAGs will be emitted as object instances, providing significant speed and memory benefits. However, shading variation in Maya instances will not be recognized.
Procedural Reentrant: This allows procedurals to run simultaneously in multiple threads and greatly speed up renders with procedurals (hair). You You most likely want to leave this on.Linearize Colors: Automatically converts colors and swatches on shaders to sRGB. You can also do this on an individual basis.
Lazy Render: Enable the Lazy Render mode to skip all passes that have existing outputs.
Output Shadow AOV: When using the Holdout workflow, you can specify the output location of the shadow collection. The options are: In Beauty Alpha or As Separate AOV. The former option matches traditional workflows.output the Shadow AOV
Enable Image Plane Filter: Render the image plane using the Pixar Image Plane Filter (Maya uses an actual geometric plane)
Adapt All: Apply the sampling quality criteria (pixel variance) to all color/illumination AOVs. This can increase render time as some AOVs may have more noise than the Beauty and trigger more samples through all the AOVs.
Adaptive Sampler: Make use of the improve sampling algorithms instead of the default. You may need to slightly increase your Pixel Variance setting to avoid longer render times (but better resulting quality on complex images)
Bucket Order: RenderMan subdivides the output image into small rectangular regions called buckets, and renders a single bucket at a time. This allows a small portion of the image to be in memory at any one time. The drop-down list allows users to choose the order in which buckets are displayed in "it" or the Render View. The default is Spiral. Note that only some bucket orders are supported for checkpointing and recovery.
Bucket Size: Specify the size of the buckets. Larger buckets will require more memory to render. Conversely, smaller buckets are less efficient for shading, but will use less memory during rendering. If your scene is using a lot of memory, you may want to try setting this field down to 8 by 8 or even 4 by 4 buckets, but most likely you will not change this.
Z Opacity Threshold: Control for adjusting the threshold of Z.O Threshold: Controls the O Threshold Controls the Opacity Threshold, if set too low, it may terminate rays early on semi-opaque objects. An objects opacity is controlled by the material Presence parameter.
Reference Frame: Once per job passes and static objects are evaluated at the frame designated here.
...
Dicing
Micropolygon Lenth: Controls the tessellation rate for displacement. The default setting of 1 will dice displacements to 1 pixel's size. (As seen from the dicing camera, typically the dice render camera).
Dice Watertight Dicing: Closes pinholes in diced geometry or attempts to close gaps in displacement.
Dicing Camera: Enables the use of a reference camera for dicing. This can be done globally, or restricted to specific objects (e.g. objects with displacements that "sparkle" as the camera moves) by also attaching this as a per-object attribute.
Reference Camera: Specify the camera to be used as your dicing camera here. Click on the widget to create a new camera, or right click in the field to select an existing camera. Note that the Reference Camera needs to be different from the render camera.
Hair
Min Hair Width: Sets a minimum width for hairs/RiCurves. Narrower hairs will be clamped to this value and their opacity will be reduced to compensate for the difference in visual weight.
Trace
Trace Decimation Rate: Controls the tessellation of ray-traced surfaces. A value of 1 dictates no decimation.
Trace Displacements: None turns off displacements; All (the default) displaces the entire surface before ray-primitive intersection tests; Fine tells the renderer that the surface should only be displaced when near the ray origin or when the ray differential is narrow.
Trace Auto Bias and Trace Bias: RenderMan will automatically compute a trace bias for displacing ray origins off a hit surface. However, if you wish to turn off the auto bias, you can set the bias manually here. Per-object settings should have Auto Bias turned off.
Trace World Origin:
Crop Window
Specify the coordinates for a crop window to render. This can be useful when rendering many iterations for debugging or lookdev when only a specific region is under consideration.
...
While scenes are exported to rib "unitless", IES files specify a unit measure. Use this setting to specify the scene unit to meter conversion factor. For instance, if 1 unit = 1 meter, use 1. If 1 unit = 1cm use 100.
Cleanup
Select the types of files that will be cleaned up on a per-job and/or per-frame basis.
...
Provides an interface for enabling, inserting, and arranging RIFilters.
Default Shading
...

