...
In Katana, you will most likely bring in a subdivision surface via Alembic or some other geometry format that supports them. You as an artist are not likely to have to do anything special to utilize them in Katana. In Maya, using the RenderMan Archive workflow, you can embed the settings used on your geometry and RfK should simply use them as set.
Any texture coordinates or other primitive variables that you need for look development must be added upstream in your pipeline. They will be available when you import your geometry into Katana.
| Info |
|---|
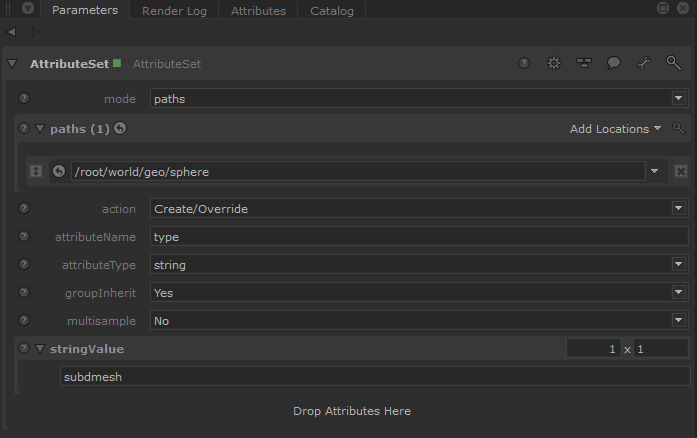
To set an object that is ingested as a polymesh into a subdivision mesh requires you use an AttributeSet node with the string value set to subdmesh and the path to your required object. The PrmanObjectStatements can be added to specify the type of SubD Mesh (Catmull-Clark, Loop, etc.) The default is Catmull-Clark. However, the OpScript provided below on this page should match the default from Maya and Houdini should you need to match them (recommended)
|
| Info |
|---|
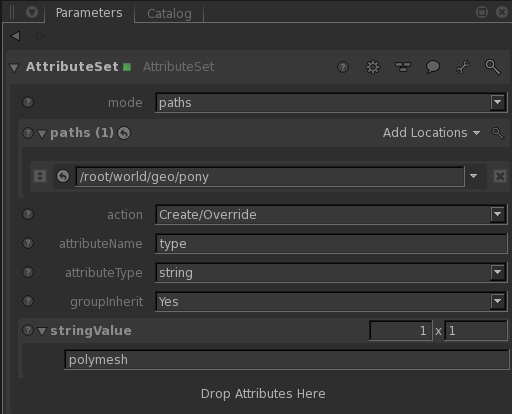
Speed Trick: If your subdivision surface is off-screen or the pixel coverage is very small, it may make sense to convert the subdivision surface to a polygonal surface. This will save memory in your render, will shorten the time to seeing the first pixel, and depending on your scene complexity, will reduce render times. To change your geometry from a subdivision surface to a polygonal surface, use an AttributeSet node to set the "type" of the geometry to polymesh. Below is a screen snapshot of what you will need to do.
|
...
When rendering surfaces in Katana, you may need to discard normals. The basic workflow for rendering smooth-looking surfaces is below:
Export normals for poly meshes polymeshes with smoothed normals that you wish to preserve when they are not going to being subdivided. This is a common "fake" for low-poly surfaces that need to look smooth. No normals export is needed when you only require hard edges/faceting.
Going to subdivide the mesh? Do not export normals for these poly meshespolymeshes, let PRMan calculate them new when they are subdivided. This also saves space for the exported file since you don't need the normals.
...
It may be useful to match what you're seeing in Maya since it may be your primary modeling package. Below are the settings necessary to achieve the same look if you asset was not exported with the data.
- Create an attribute Script OpScript node
- In the CEL section, select the mesh(es) where you wish to apply the attributes. In this case we've added the subdmeshes from Maya
- Custom CEL statements
- /root/world/geo//*{@type == "polymesh"}
- /root/world/geo//*{@type == "subdmesh"}
In the script section add the following:
- DelAttr( 'geometry.vertex.N')
- SetAttr( 'type', ['subdmesh'] )
[Code Block language cpp Interface.SetAttr('geometry.facevaryinginterpolateboundary',
]IntAttribute(3
))
[Interface.SetAttr('geometry.facevaryingpropagatecorners',
]IntAttribute(0
))
[Interface.SetAttr('geometry.interpolateBoundary',
] )IntAttribute(1
(Note: This deletes the existing normals off the mesh as renderman will create its own for a SubD mesh. This is explained in the above section.)'type' changes the mesh to a subdivisional surface)) Interface.DeleteAttr('geometry.vertex.N'
) Interface.SetAttr('type', StringAttribute('subdmesh')) - Custom CEL statements
- In the CEL section, select the mesh(es) where you wish to apply the attributes. In this case we've added the subdmeshes from Maya
- Options for geometry.facevaryinterpolateboundary
- 0 (old style)
- 1 (new style)
- 2 (new style, no corners)
- 3 (new style, smooth internal only) This is the current Maya default
- Options for 'geometry.facevaryingpropogatecorners'
- 0 (off) This is Maya default
- 1 (on)
- Options for 'geometry.interpolateBoundary'
- 0(no interpolation)
- 1(edge crease, corner crease) This is the Maya default
- 2(edge crease only)
- geometry.vertex.N
- We delete the existing normals off the mesh as RenderMan will create its own for a subdivision mesh. This is explained in the above section.
- type
- Changes the mesh to a subdivision surface
For Developers
If you are implementing support in a custom Katana plugin for subdivision surfaces, you will be interested in how RenderMan for Katana translates geometry attributes to RenderMan's subdivision format. See the developer documentation here.
We support the following attributes, which are converted to RenderMan's internal format. You can also examine the code for RenderMan for Katana to see the details of how each are handled.
- geometry.edits
- geometry.edits.tags
- geometry.edits.numArgs
- geometry.edits.intArgs
- geometry.edits.floatArgs
- geometry.edits.stringArgs
- global.prmanStatements.prmanStatements.primAttributes.subdivisionMesh.scheme
- global.prmanStatements.subdivisionMesh.attributeSubsets "shading"|"geometrydefinition"|"geometrymodification"
- geometry.faces
- geometry.faces.visible
- geometry.faces.material
- geometry.faces.prmanStatements
- geometry.faces.lightList
- geometry.holePolyIndices
- geometry.creaseLengths
- geometry.creaseIndices
- geometry.creaseSharpness
- geometry.creaseSharpnessLengths
...
- geometry.facevaryinginterpolateboundary
- geometry.facevaryingpropagatecorners
- geometry.interpolateBoundary
...