| Table of Contents |
|---|
If you have geometry in your scene that is reused in multiple places, instancing provides you with the ability to reduce the memory footprint of your renders if you do a little bit of extra work. For example, if your scene is composed of multiple buildings, each rotated a bit differently, you can use instancing to only load one copy into memory.
RenderMan for Katana supports multiple three approaches to instancing: leaf-level instancing, hierarchical instancing, and instance arrays. The first is a very deliberate approach approach, leaf-level, lets you instance matching pieces of geometry via an attribute. The second and third are very deliberate approaches where you set up an object master and then explicitly instance it. The second is where you give all of your instances the same "instance.ID" RenderMan for Katana will automatically use the first as the master, and then will create instances for the others. The second approach is a bit simpler in that it only depends on naming instead of having to know scene graph locations. This makes it easier to instance objects across shots, or to instance them irrespective of where they end up in the hierarchy.
For a more in-depth discussion about instancing, please read the Instancing in RenderMan documentation. It provides some great background information as well as some tips you should know about if you are instancing subdivision surfaces.
Example
Below are two examples for how to set up your Node Graph to produce instancing. It shows that you can override certain attributes on each instance – in this case, the material – to give each instanced object a different look.
| View file | ||||
|---|---|---|---|---|
|
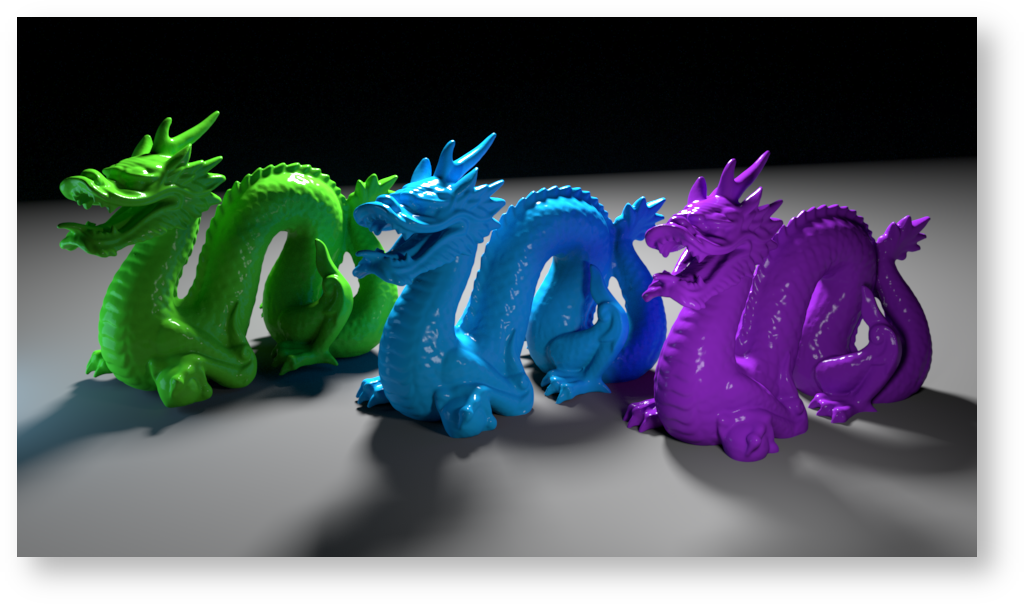
In this example, the green and the purple dragons are instances of the blue dragon. The materials have been overridden at the instance level. If you don't have a copy of the dragon, you can use any geometry you like. Just change the path to the Alembic_In node.
The file has three different approaches to instancing that you are likely to see in production.
...
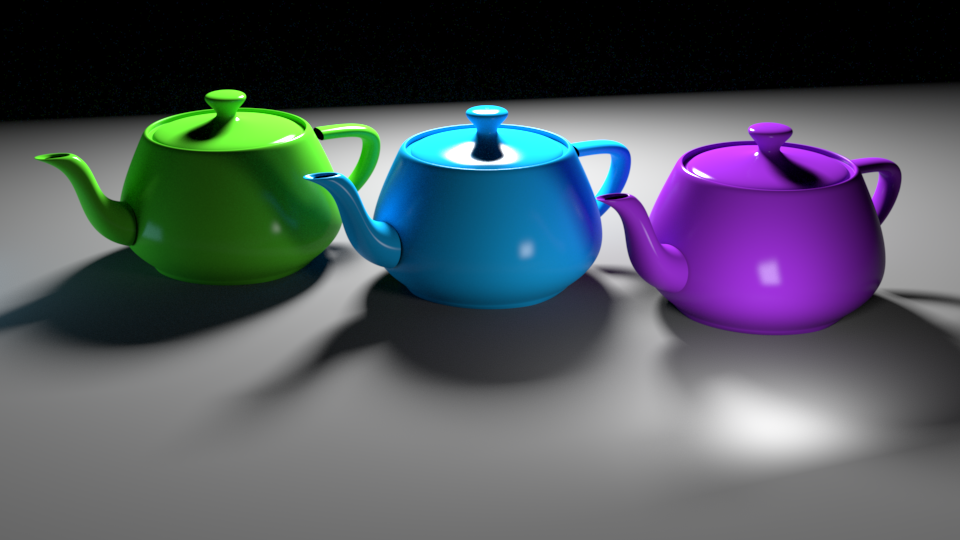
The teapots_instancingExample.katana file includes an example of how to render the above image using these methods.
| Note | ||
|---|---|---|
| ||
Instancing can save on memory but may impact performance such as time to first pixel (how quickly a render begins sending pixels) since Katana may process many nodes. Options where you can instance a hierarchy will be more efficient for time to first pixel but you may lose control of some attributes you may wish to override, this is the trade off. In the PrmanGlobalStatements you can specify You can read more about nesting versus flattening on the main Instancing page. Essentially, the SceneGraph flattening time corresponds to the number of instances multiplied by the number of locations below the instance source. The more complex your instance sources are and the more instances you have, the greater the cost of flattening becomes. |
Leaf-level instancing
You may find that your scene is taking a lot of memory, and you think that because your scene has lots of repeated geometry, that you may be able to take advantage of instancing. In this case, you go through the scene and manually set up the instancing. The HierarchyCopy node in the example represents some arbitrary set of complex operations that got your Scene Graph into the state that it is in. The best that you will want to do is instance large chunks of geometry and set up Transform3D nodes to move the instances in to place.This approach uses The leaf-level instancing approach can be used to efficiently turn already existing geometry locations into instances of each other via the instance.ID attribute to tell . RenderMan for Katana that each location in the Scene Graph that shares the name used within the instance.ID attribute should be instances of one another.
The section below explains how to use the instance.ID attribute to create instances.
Instance Geometry as it is Imported
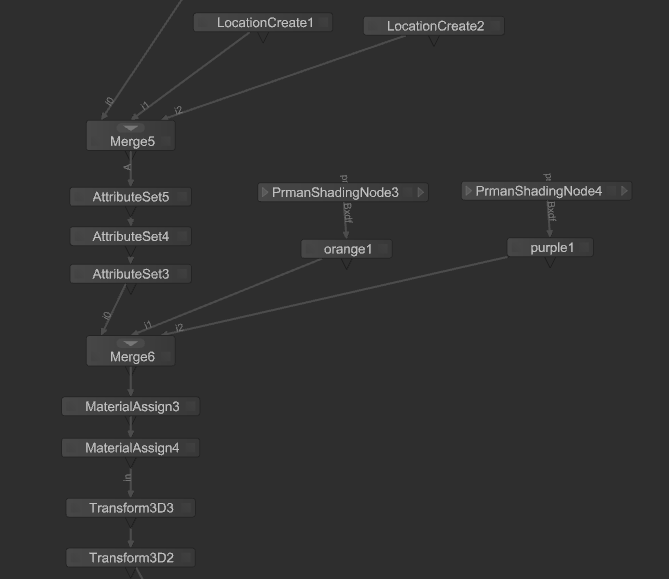
This approach uses the same instance.ID approach that the above method uses. However, if you are creating the geometry import yourself, you will save lots of processing time within Katana if you create your instances up-front. The LocationCreate nodes show you what to do if you want to instance geometry as it is brought in to Katana.
There are three steps needed to get this approach to instancing working.
- Assign a name to the instance.ID attribute of the instance source using an AttributeSet node
- Create Scene Graph locations for the instanced geometry using the LocationCreate node in your Node Graph
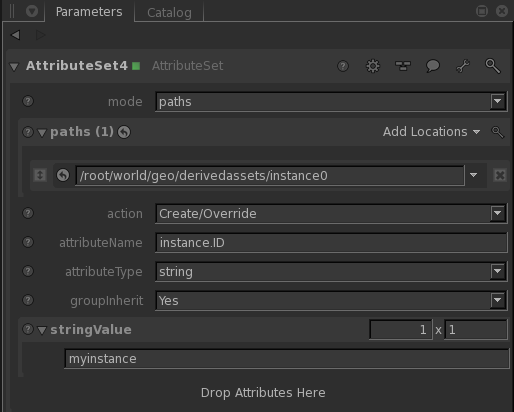
- Use an AttributeSet node to create instance.ID attributes on the new Scene Graph locations, and set the value to the same name that you used for the instance source
- Use a Transform3D node to move the instances into position
Once you have created your instances, you can then override the material if you so desired using the standard Katana mechanisms for applying a material to a Scene Graph location.
Below I have taken a screen snapshot of your your Node Grpah should look, as well as how your AttributeSet nodes should look.
Defined Instance Sources/Object Masters and Instances
will make the first location it encounters with a certain instance.ID into the geometry master, and all subsequent locations will be instances. All locations with matching instance.IDs must be identical, otherwise there could be undefined behavior depending on which location RenderMan for Katana encounters first. The screenshot below shows an example of how to set the instance.ID attribute via an AttributeSet node.
Like its name states, leaf-level instancing only works on Scene Graph locations with no children. RenderMan for Katana will not traverse past a location with the instance.ID attribute, so it cannot be used to instance groups of geometry. If you need to instance a hierarchy, you will need to use either hierarchical instancing or an instance array. These are described in the next two sections.
Hierarchical Instancing
In this approach The last approach in the file is the one where specific instance source/object masters are called out via their Scene Graph locations and are then referenced in to their instance locations. This approach is good if you have several different kinds of instances you need to create, but don't want to worry about naming collisions.want to instance a hierarchy of locations.
The steps to creating instances using this approach are as follows.
- Use an AttributeSet node to change Change the "type" of the Scene Graph location to be used as the object master to "instance source". Note that the Scene Graph location for the instance source must be a group. If you change the type of a geometric primitive to "instance source", then RfK will not have any information about the primitive type, and the instances will not render.
- Use the LocationCreate node in the Node Graph to create Create locations for your instances. This can be done with a LocationCreate node or via an OpScript. If you want your instance source to be visible, you must also create a new instance for that as well (by contrast, the instance.ID approach will automatically make your instance source visible).
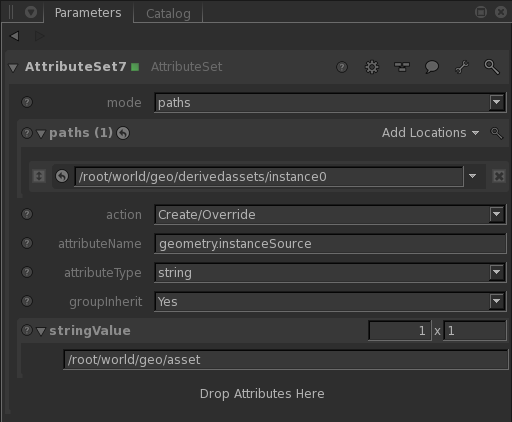
- Set the geometry.instanceSource attribute of each of your instance locations to be the Scene Graph location of your instance source
- Use Set the transforms on the instance locations using a Transform3D node to move the instances in to positionor an OpScript.
The screen snapshots below show examples of how to set the necessary attributes with AttributeSet nodes.

Once you have created your instances, you can then override the material if you so desired desire using the standard Katana mechanisms for applying a material to a Scene Graph location. Note that any material assigned at the instance source location will be ignored. This is to allow for overrides on the instance locations. However, you will only be able to override the materials at the root of the instance source location. Overrides to the materials on child locations of an instance source will need to be done with user attributes.
Instance Arrays
Just like in hierarchical instancing, this approach uses direct assignment of locations as an instance sources. Locations marked as instance sources can be referenced by the instance array location. This approach has some advantages and disadvantages over hierarchical instancing. The main advantage is that you only need to create one Scene Graph location .
Here I have taken a screen snapshot of how your AttributeSet nodes should look.
to represent all your instances. This can save on Katana Scene Graph processing time. Additionally, you can reference multiple instance sources in a single instance array. The main disadvantage is that instance arrays do not provide ways to override all attributes per-instance - only user attribute overrides are supported. It is important to determine your requirements before deciding on an instancing method.
The steps to set up the instance source locations are the same as in hierarchical instancing. Simply set the type of the group representing the object master to "instance source". Then you will need to create a location of type "instance array" on which you will build up your instance array attributes.
These are the attributes required on the instance array location:
| string geometry.instanceSource | The array of instance source locations referenced in this instance array. |
| int geometry.instanceIndex | The instanceIndex attribute has one element for each instance in the instance array. Each element maps to an index in the geometry.instanceSource attribute. This mapping determines which instance source is used for each instance. |
| double or float geometry.instanceMatrix | For each instance in the instance array there are 16 values in the instanceMatrix representing the instance's transformation matrix. Note that this transform is relative to transform of the instance array itself. |
Additionally, there are some optional attributes available:
| int geometry.instanceSkipIndex | A list of indices in to omit from the instance array. Used to prune out certain instances. |
| group geometry.arbitrary | While formatted as constant PrimVars, these attributes become user attributes in the renderer. There should be an element in the value and indexValue attributes for each instance in the instance array. |
See this instanceArray.zip example (also available in RfK's Examples directory) for an example of how to set up an instance array from a point cloud.
Overriding Materials at the Instance Level
Shading overrides can be accomplished in multiple ways. In the example file, a simple approach is taken where a completely new Bxdf is assigned to each instance. Fancier ways to vary the shading on each instance are possible with RenderMan for Katana. One such approach is to create a unique "user" attribute per instance. Within your master material, you would create a PxrAttribute pattern that reads the user attribute, and then use the output to drive one of the parameters on the Bxdf.
Further Reading
Instancing in the Katana User Guide. Open it from the Help menu within Katana.
While you can vary Bxdfs, transforms, light linking, and attributes per instance, there are some things that cannot be varied. PrimVars and parameters under the "primvars" and "primAttributes" groups in PrmanObjectStatements cannot vary per instance. Displacement also cannot vary across instances because it changes the representation of the geometry master in the renderer. For a more in-depth discussion about instancing, please read the Instancing page in RenderMan documentation. It provides some great background information as well as the full list of what can vary across instances.
Instancing lights
Lights can be instanced with the methods described above or using Light Arrays. There are a few more restrictions on instancing lights than on instancing geometry. Light shader parameters cannot vary per instance. Similarly, PxrPortalLight and PxrEnvDay light cannot be instanced. Another thing to consider is that If you want to instance lights with light filters, do not use the leaf-level instancing approach, as this approach doesn't allow for instancing hierarchies.