...
Burn Mapping On SaveAnchor ItPreferences_BurnMappingOnSave ItPreferences_BurnMappingOnSave
| Info |
|---|
| IT will now burn in the color space automatically when you save to jpg or other 8Bit image formats |
Appearance
New bucket indicator
This allows you to edit the color of the recent bucket marker. See Recent Bucket Markers.
Events
Focus Incoming Render
If toggled on, new catalogs will default to having the Burn Mapping On Save option turned on (Catalog->Burn Mapping On Save). With the Catalog->Burn Mapping on Save option turned on, images saved via File->Export will have their current view mapping burnt into the pixel values before writing to disk. This is useful if you want to share your renders from "it", especially in 8bit oriented file formats like png and jpeg.
Appearance
New bucket indicator
This allows you to edit the color of the recent bucket marker. See Recent Bucket Markers.
Events
Focus Incoming Render
If toggled on, the image window will automatically display the current incoming render.
Display Mapping
Sets which view mapping to use when Automatic view mapping is selected from the remap menu, for different bit depths (8-bit, 16-bit, Float) and whether the image is from an incoming render or from disk.
Shortcuts
Allows you to edit any of the hotkeys mapped to specific commands in "it".
...
the image window will automatically display the current incoming render.
Display Mapping
Sets which view mapping to use when Automatic view mapping is selected from the remap menu, for different bit depths (8-bit, 16-bit, Float) and whether the image is from an incoming render or from disk.
Shortcuts
Allows you to edit any of the hotkeys mapped to specific commands in "it".
| Anchor | ||||
|---|---|---|---|---|
|
...
| Anchor | ||||
|---|---|---|---|---|
|
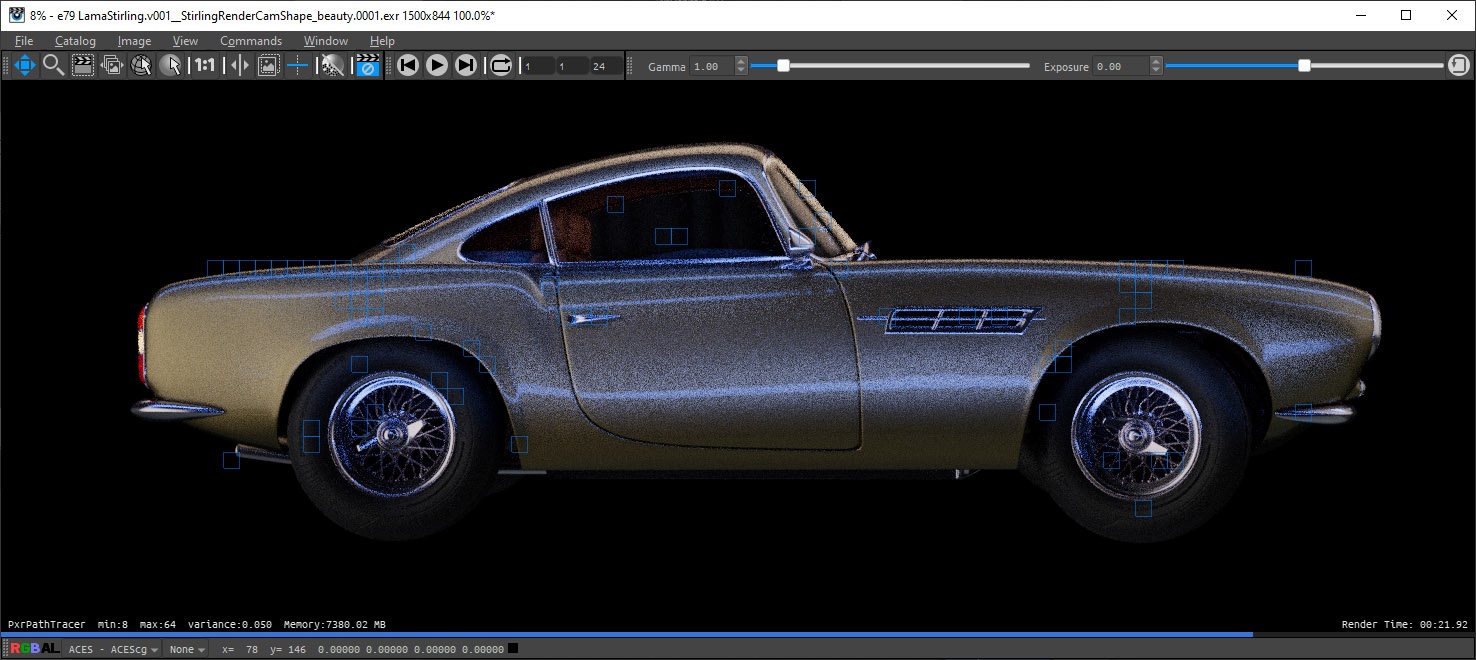
'it" can interactively denoise beauty renders for preview purposes using Nvidia's AI Denoising solution. You can choose this in the View menu or press N on the keyboard to toggle this on and off. This requires the latest Nvidia drivers (391.89 as of this writing) and an Nvidia GPU on the system that is reasonably modern (Minimum is Kepler, newer cards will perform significantly better). Images that are more converged (has more samples) will achieve better quality. Insufficient convergence will resemble a watercolor or "painterly" style image.
This feature is meant for interactive preview rendering only, it it not designed for final renders or animation. AI Denoise only operates correctly on the beauty (Ci) and not on AOVs. To correctly view AOVs, toggle the denoiser off or you will see artifacts. The final EXR output is unaffected by the denoiser. Use the Snapshot feature of "it" to save the denoised Beauty instead (see below this entry).
| Info |
|---|
Denoising options want statistically independent pixels, this means you should either manually provide the rendering option for "Importance Sample Filtering" for pixels or select the Denoise option in the appropriate bridge product that will enforce the Importance Sample Filter for images. If this is not enabled then no change will be seen when using the Optix Denoiser. |
| Before After Image Slider | ||||||||
|---|---|---|---|---|---|---|---|---|
|
'it" can interactively denoise beauty renders for preview purposes using Nvidia's AI Denoising solution. You can choose this in the View menu or press N on the keyboard to toggle this on and off. This requires the latest Nvidia drivers (391.89 as of this writing) and an Nvidia GPU on the system that is reasonably modern (Minimum is Kepler, newer cards will perform significantly better). Images that are more converged (has more samples) will achieve better quality. Insufficient convergence will resemble a watercolor or "painterly" style image.
This feature is meant for interactive preview rendering only, it it not designed for final renders or animation. AI Denoise only operates correctly on the beauty (Ci) and not on AOVs. To correctly view AOVs, toggle the denoiser off or you will see artifacts. The final EXR output is unaffected by the denoiser. Use the Snapshot feature of "it" to save the denoised Beauty instead (see below this entry).
| Info |
|---|
Denoising options want statistically independent pixels, this means you should either manually provide the rendering option for "Importance Sample Filtering" for pixels or select the Denoise option in the appropriate bridge product that will enforce the Importance Sample Filter for images. If this is not enabled then no change will be seen when using the Optix Denoiser. |
| Before After Image Slider | ||||||||||
|---|---|---|---|---|---|---|---|---|---|---|
|
| Anchor | ||||
|---|---|---|---|---|
|
From the Commands window, you can choose to Snapshot an image. This makes a quick copy of either a completed render or an (in-progress) interactive session. There is also an option for No AOVs should you just need to capture the beauty render. This is useful for interactive sessions where you want to save how a current scene looks before you make a change and then compare them. This places the snapshot next in the Catalog list. To save an image that is using the Nvidia AI Denoiser, you must use Snapshot as an export will only save the underlying raw image.
| Anchor | ||||
|---|---|---|---|---|
|
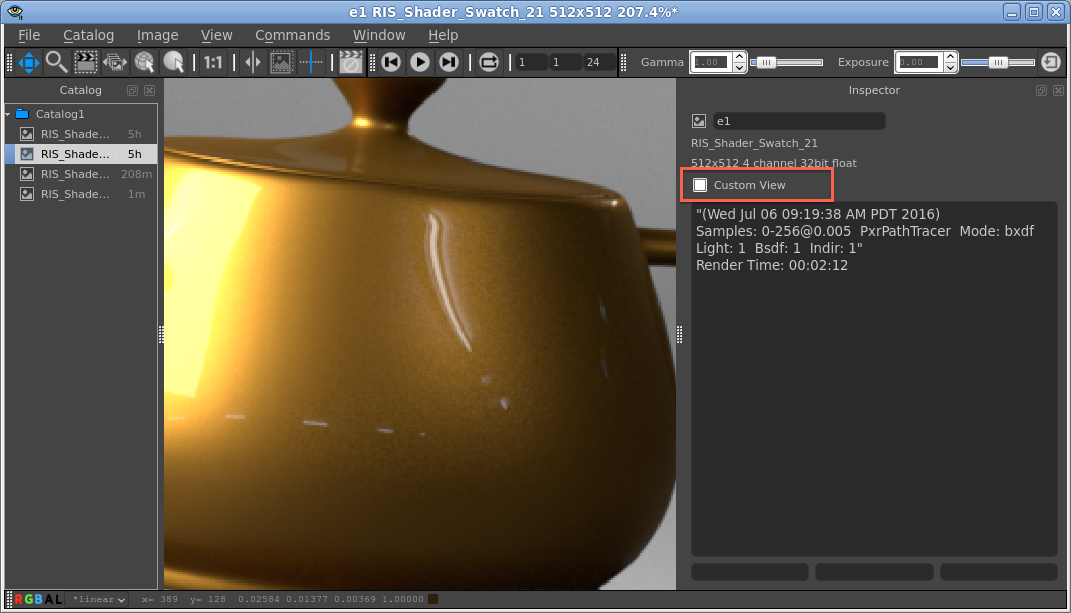
Views in "it" are a combination of zooms, pans, pixel aspect ratio, and view mappings. By default all images in a catalog share a view. This is convenient when you want to step through a shot that you've rendered to "it" (hotkey PageUp/PageDown). When you zoom in and step to the next frame in the shot the zoom and pan remain the same. However, sometimes you'd like to be zoomed way in on one image to look at some feature and then flip between that and a zoomed-out image. "it" accommodates this with Custom View. When you turn on Custom View for an image, that image then has its own zoom and pan, independent of the other images in a Catalog. Custom Views are saved if/when the Session (or Catalog) is saved.
Pixel aspect ratio is useful when working on projects that generate non-square imagery. One example of this is the film format Cinemascope. In some pipelines you might decide to keep your digital files in a format where a pixel is half the size in the horizontal direction than the vertical. 'it' allows you to specify this in the view so that on your monitor images look normal. This menu is fully configurable from your it.ini file including the names on the menu and the aspect ratio of the pixels. You may also attach shortcut keys to different aspect ratios even if you customize this menu.the menu and the aspect ratio of the pixels. You may also attach shortcut keys to different aspect ratios even if you customize this menu.
| Anchor | ||||
|---|---|---|---|---|
|
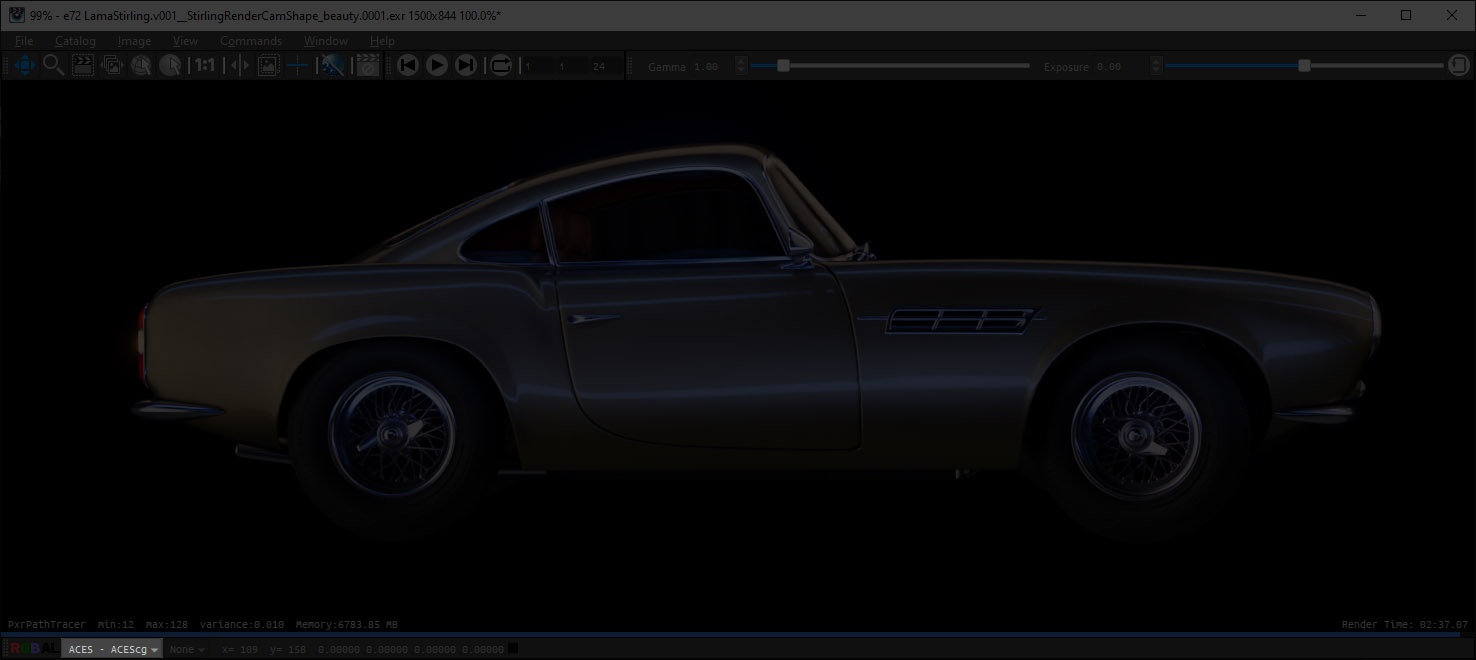
Selecting View->View HUD Numbers (lowercase 'v') will then toggle a heads-up display containing image stats
Can you change the HUD location and format using View->Move HUD Numbers (uppercase 'V'): changes HUD location and format
Moving the HUD cycles through:
- top-left (default)
- top-center
- top-right
- bottom-right
- bottom-center
- bottom-left
Left/Right HUD: Rays/Sec, Mem, CPU %
Centered HUD: Integrator, min/max samples, variance, memory, render time
...
| Anchor | ||||
|---|---|---|---|---|
|
When 'it' is being used as the destination for a render it will display a rectangle around each bucket as it arrives. The indicator will fade over a few seconds. This is useful when an image is being refined as it is sometimes difficult to see what part of the image the renderer is working on. This feature can be toggled on and off and the color of the rectangle can be altered in the preference dialog.
| Anchor | ||||
|---|---|---|---|---|
|
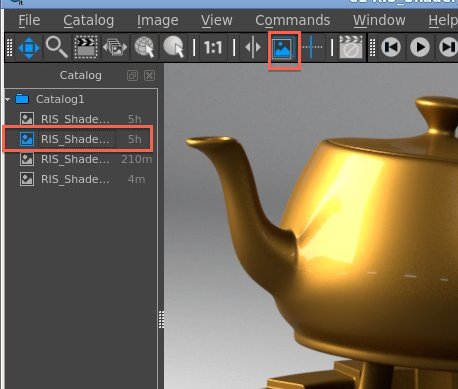
Any single image in a Catalog can be set to be the Background image. When you then select other entries in that Catalog, the displayed image is the result of compositing the selected image over the nominated background. To toggle the current image to be a background image, use Image->Toggle Background. The icon next to the image in the Catalog will then light up. See Working With Background Images.

| Anchor | ||||
|---|---|---|---|---|
|
The remap menu shows the color space that your image is in. Typically this would be linear for rendered images and sRGB for 8-bit image files. By default "it" chooses the image space of the image and when it does this the image space is preceded by a *. You can use the menu to override "it"'s choice (the * indicator will go away)

"it" supports view mapping output images to accommodate your workflow of choice using the OpenColorIO system. Your view mapping defaults can be set for images rendered to "it" as your frame buffer (regardless of bit depth) or for imported images (with different mapping for different types, if necessary).
There are several important things to remember about remapping:
Remapping is applied only for viewing files. It is not burned in. See Burn Mapping On Save preference.
Images rendered via RenderMan are, by default, in linear space, unless exposure is applied to the output (which can be done in RfM via the Output Settings tab of the RenderMan controls).
If you do apply an exposure to your output, be sure to make the proper adjustment to the default image mapping for rendered images.
The OpenColorIO setup can be changed via your it.ini, though, as always, we strongly recommend making the changes in a site-specific surrogate ini file, referenced via RMS_SCRIPT_PATHS. "it" will also use the environment variable OCIO if it is set to find the OpenColorIO config file.
A special entry on the remap menu is the Shadow Map option, which is useful for viewing shadow map files. These files can have huge ranges that are well beyond zero to one, so the traditional way to display these has been to rescale the min and max values to zero and about 0.9, and then invert them with (1 - val).
...
The photo and film industry has been using color rendition charts for decades to ensure high-quality results. You can learn more by reading one of many articles on the topic.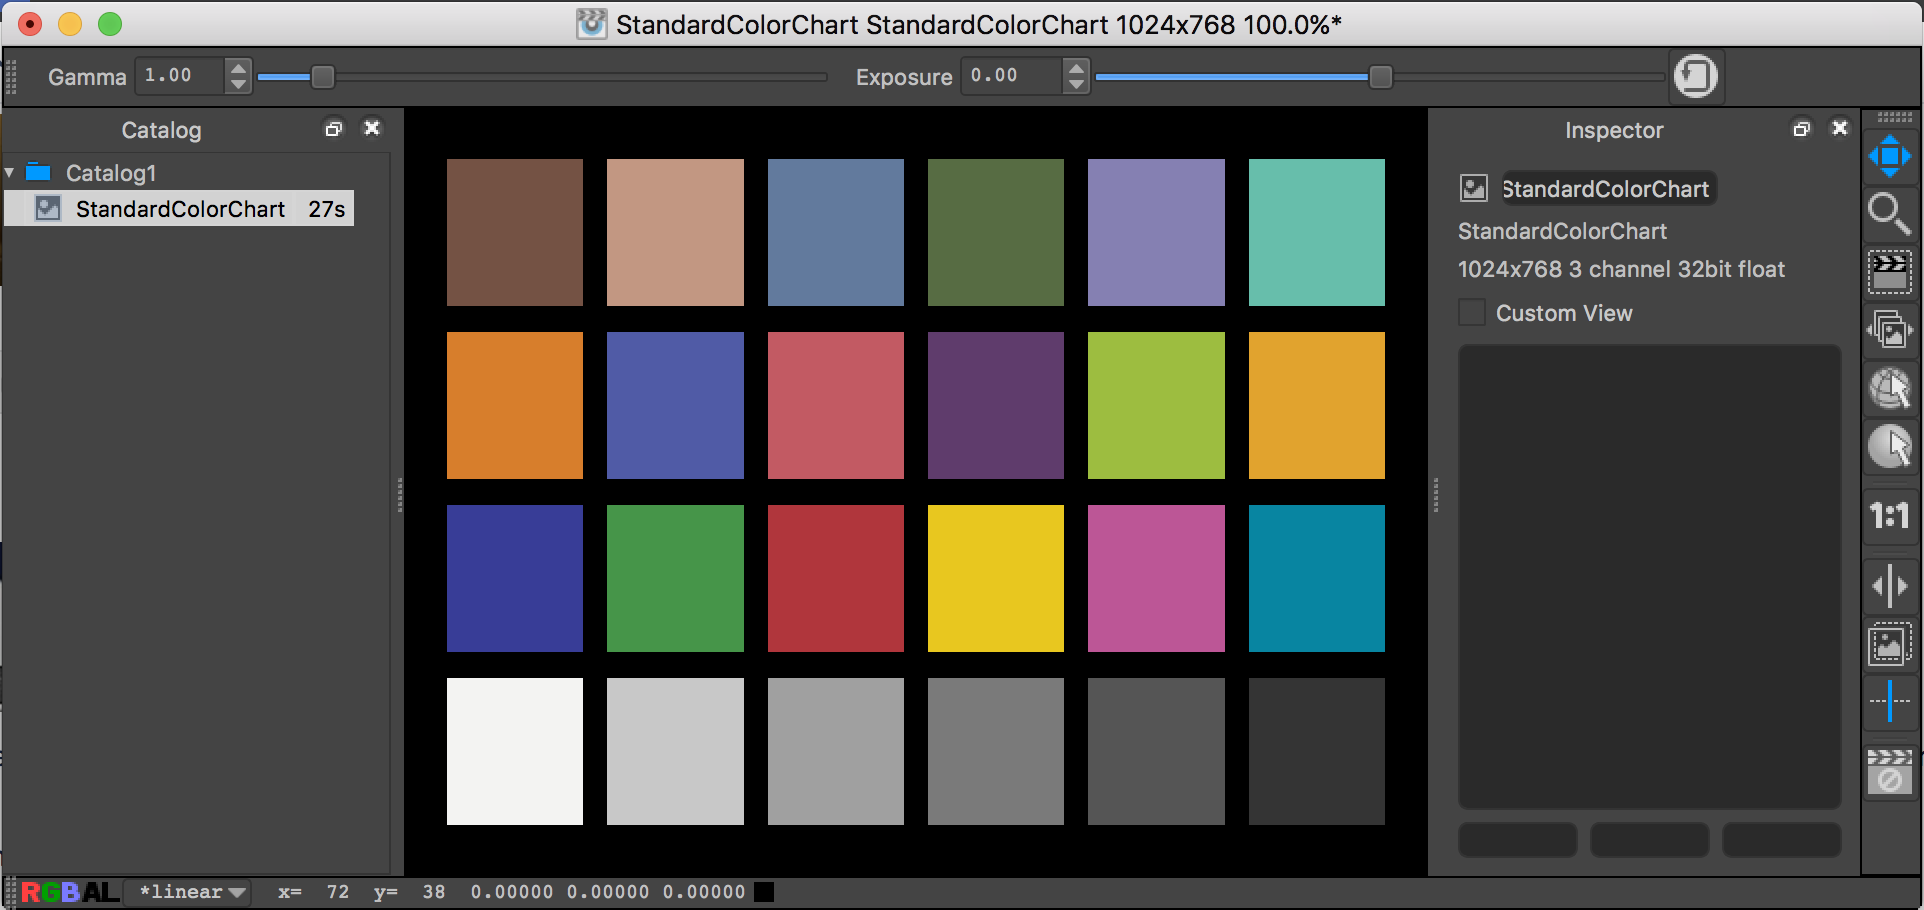
It offers a standard color chart generator (using published sRGB values) that can be used in your look-dev renders as an stable color reference.
...
Often, it is useful to create a heat-map from a data image to visualise visualize its content. This function offers a few controls to generate heat maps from single-channel images or the luminance of a color image.
| Tip |
|---|
|
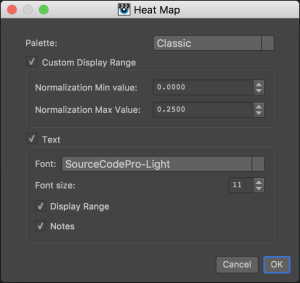
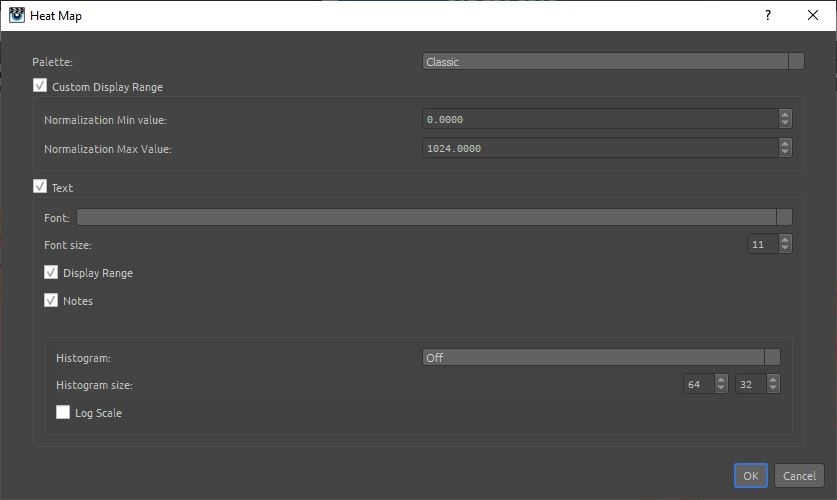
Palette
There are 3 different palettes you can choose from: Classic, Fire and Hue.
...