Contents
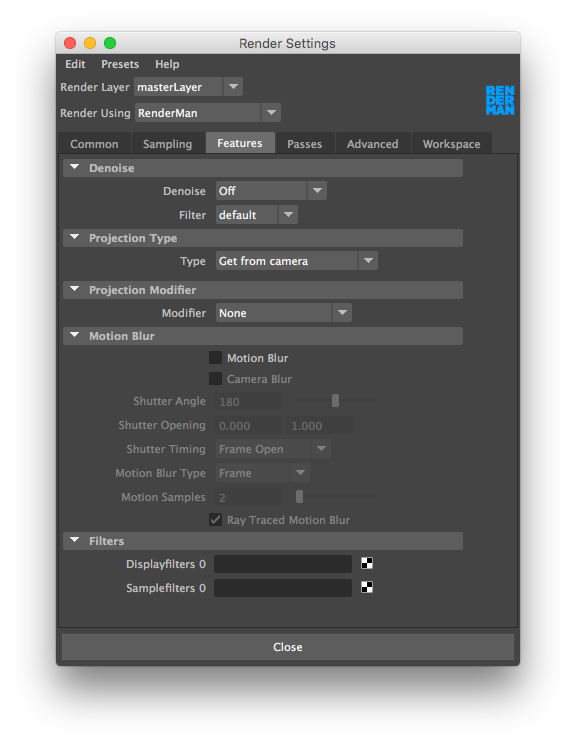
The features tab allows you to enable special features of the renderer, such as Motion Blur and Denoising.
Denoise
Here you can turn on denoising which will denoise an image when batch rendering only. Frame denoise will denoise each frame individually, while Cross-frame denoise will calculate multiple frames at once, taking into account motion blur across frames.
Filter: There are a few denoise filter options, mainly you should use the default filter unless denoising volume renders, for which there is a specific volume filter.
Projection Type
Allows a few types of different camera projections to be used. For instance, the PxrCamera projection allows physically based camera controls for doing tilt shift or vignetting. Or the Omnidirectional Stereo projection renders images in a format suitable for VR viewing.
Projection Modifier
Use this to set the PxrRollingShutter projection, which simulates the rolling shutter effects from digital cameras. This is mainly used in conjunction with motion blur.
Motion Blur
RenderMan has a number of controls for creating fast and efficient motion blur.
Motion Blur: Enabling motion blur causes moving objects to be blurred along their path of movement in order to prevent temporal aliasing and strobing. When using motion blur, you should increase the number of pixel samples (max samples in the sampling tab), and expect longer rendering times.
Camera Blur: The renderer will ignore the movement of the camera when computing motion blur when this feature is disabled. If you do move the camera and want everything in the scene to blur accordingly, you will need to turn this feature on; however, you should expect this to be a potentially expensive operation since everything in the scene will now undergo motion blurring calculations.
Shutter Angle: Shutter Angle is only meaningful when Motion Blur is enabled. It controls how long the shutter is open during a frame. Measured in degrees a setting of 360 opens the shutter for the entire frame. The larger the angle, the greater the blur, which may increase render times as more samples are needed to smooth out the blur.
Shutter Opening: By default the shutter effectively opens and closes instantly. The Shutter Opening setting is two values, a and b which are fractions of the shutter interval which let you adjust how long it takes the shutter to open and close. From 0 to a the shutter opens, and from b to 1 it closes.
Shutter Timing: Shutter Timing allows you to control how the opening of the shutter should align with the frame. It can open at the start of the frame, or open before the frame so that it is centered on the frame or will close at the start of the frame.
Motion Blur Type: The Frame option causes the positions of all objects to be calculated only at frame boundary times, and will rely on the renderer to perform linear interpolation of the object positions in order to determine where they are at shutter open and close times. The Frame option results in faster rendering, at the expense of less accurate motion blur. Choosing Subframe will cause the position of objects to be calculated exactly at shutter open and close time, creating blur with higher fidelity, at a slightly increased cost.
Ray-Traced Motion Blur: Controls whether motion blurred objects appear in ray-traced results. If your reflective object is moving or deforming you should disable this parameter to avoid self-intersection artifacts. If your mirror isn't moving, enable this to see the reflected objects properly blurred.
Filters
These allow the use of Display or Sample Filters.

