Contents

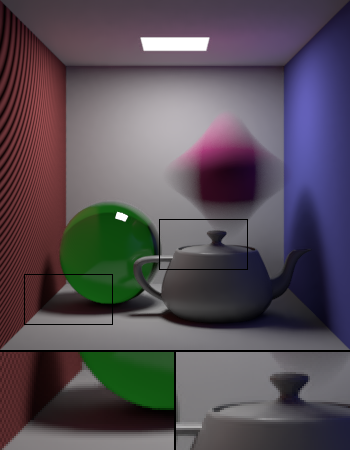
96 samples per pixel, before and after denoising
Monte Carlo algorithms have diminishing returns on the number of samples. To cut the amount of noise in a rendered image in half, it can commonly take four times the number of samples. RenderMan ships with a new tool that offers an alternative approach to reducing noise in rendered images. This tool was originally created by Walt Disney Animation Studios and Disney Research for Big Hero 6 and as a result has already been tested and proven in feature film production.
Basic Filtering
Using Maya
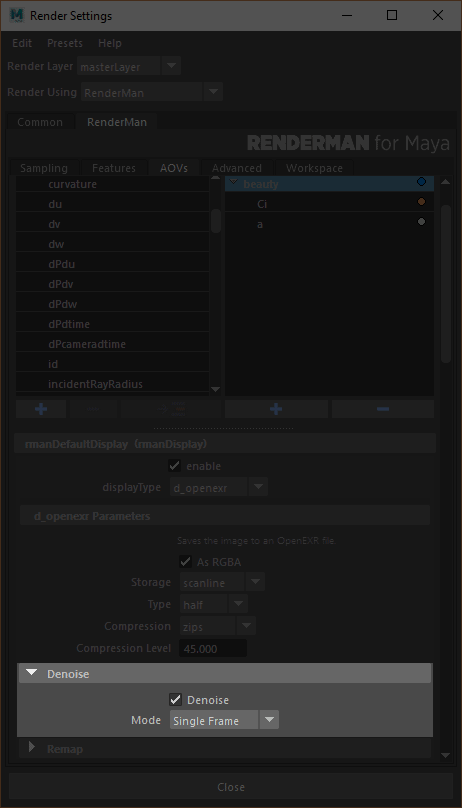
Using the denoising tool from RfM is fairly straightforward. The AOVs tab under Render Settings now contains a drop-down for each display driver from which you can select Frame or Cross-frame filtering. Choose Frame and RfM will automatically apply the settings needed to produce a denoisable image. This will execute the tool as a post-process and removes noise through statistical filtering on specially configured EXR images.
Since this is applied as a post processing tool, you are required to batch render the frame to automatically generate denoised files. It's not currently supported in interactive rendering.
Using Katana
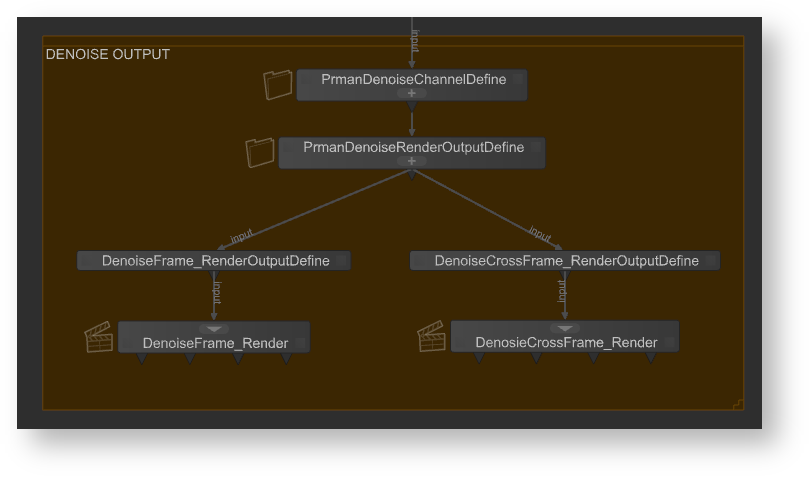
We need to set up a few nodes for running the denoise utility as a post process.
Prman Globals Settings
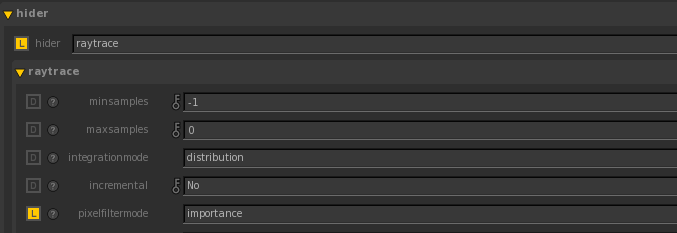
Turn on importance sampling for the raytrace hider's pixel filter mode. This will eliminate splotchiness in the render.
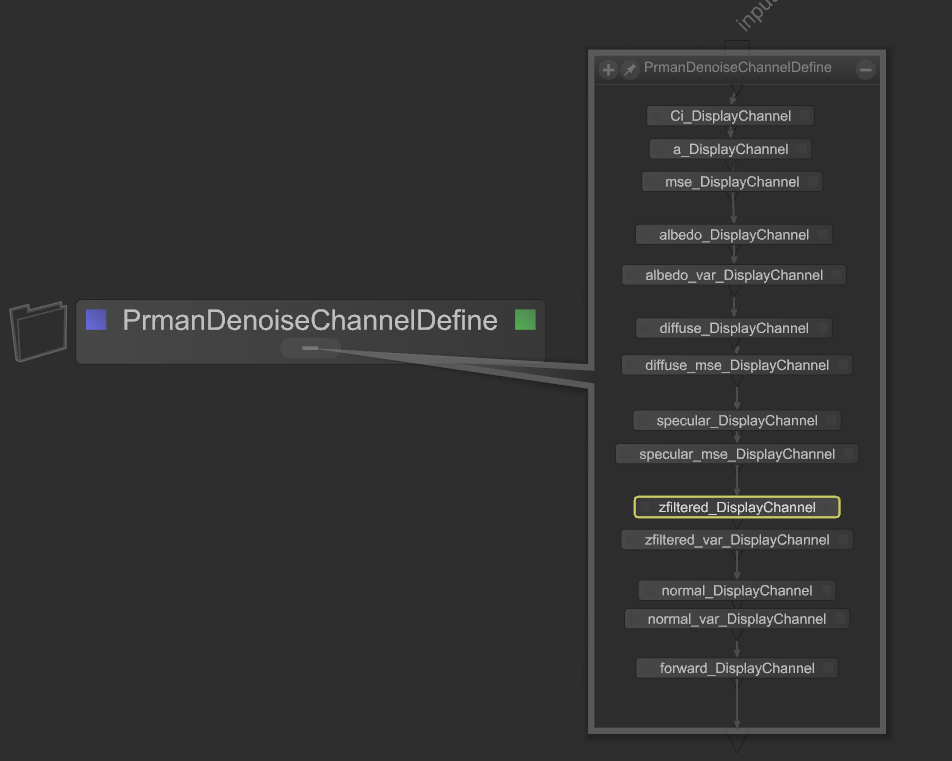
PrmanDenoiseChannelDefine
Create a PrmanDenoiseChannelDefine node which is a macro for creating all the specific DisplayChannels required for the denoise utility.
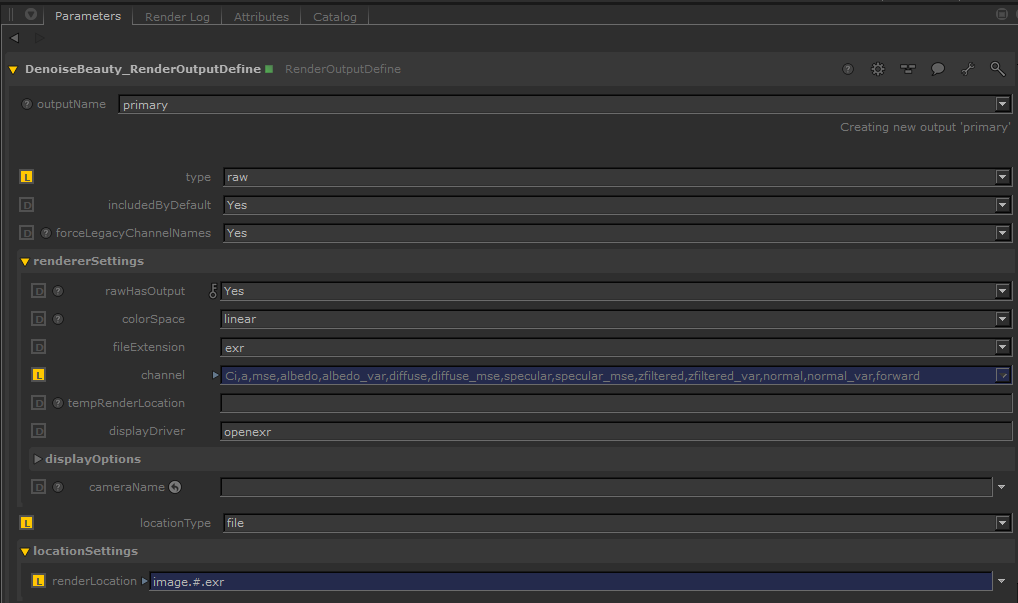
PrmanDenoiseRenderOutputDefine
Create a PrmanDenoiseRenderOutputDefine node which is a macro for rendering a multichannel OpenEXR file for the beauty pass combined with the AOVs.
Be sure the Type is set to raw
 If your pipeline does not support multichannel EXR, you can use
$RMANTREE/bin/exrmergeto combine the AOVs into a multichannel EXR. Then use this merged multichannel EXR for the denoise utility. Note that each AOV's type should be set to "raw" because this preserves the channel name in the EXR which the denoise utility will look for. Combined EXR using Katana's RenderOutputDefine's merge will not work with the denoise utility.Running Denoise Via RenderOutputDefine Script (Single Frame)
Create a RenderOutDefine. Wire this node to the previous RenderOutputDefine node. Select script for the type, select primary for the scriptInput, and set the scriptCommand to the following:
$RMANTREE/bin/denoise $INPUT
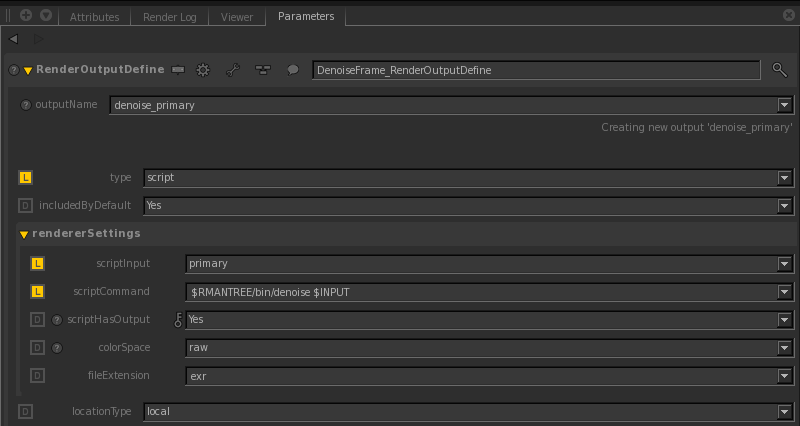
By default, it will write out
<image>_filtered.exr. This can be changed by specifying-o. Rundenoise -helpfor more information on other denoise utility options.
Users must run a disk render in order to denoise an image. Denoising is not currently supported in interactive rendering. Note that we can also run the denoise utility for AOVs; see Layered Filtering below for more information.
Required Channels
Setting up a scene in RIB for denoising is more involved if you are doing it manually, but most of the work is in adding the correct DisplayChannel lines to the prologue. Here is the basic snippet that you will need:
# Beauty...
DisplayChannel "color Ci"
DisplayChannel "float a"
DisplayChannel "color mse" "string source" "color Ci" "string statistics" "mse"

# Shading...
DisplayChannel "color albedo" "string source" "color lpe:nothruput;noinfinitecheck;noclamp;unoccluded;overwrite;C(U2L)|O"
DisplayChannel "color albedo_var" "string source" "color lpe:nothruput;noinfinitecheck;noclamp;unoccluded;overwrite;C(U2L)|O" "string statistics" "variance"
DisplayChannel "color diffuse" "string source" "color lpe:C(D[DS]*[LO])|O"
DisplayChannel "color diffuse_mse" "string source" "color lpe:C(D[DS]*[LO])|O" "string statistics" "mse"
DisplayChannel "color specular" "string source" "color lpe:CS[DS]*[LO]"
DisplayChannel "color specular_mse" "string source" "color lpe:CS[DS]*[LO]" "string statistics" "mse"

# Geometry...
DisplayChannel "float zfiltered" "string source" "float z" "string filter" "gaussian"
DisplayChannel "float zfiltered_var" "string source" "float z" "string filter" "gaussian" "string statistics" "variance"
DisplayChannel "normal normal" "string source" "normal Nn"
DisplayChannel "normal normal_var" "string source" "normal Nn" "string statistics" "variance"
DisplayChannel "vector forward" "string source" "vector motionFore"
DisplayChannel "vector backward" "string source" "vector motionBack"

Display "image.exr" "openexr" "Ci,a,mse,albedo,albedo_var,diffuse,diffuse_mse,specular,specular_mse,zfiltered,zfiltered_var,normal,normal_var,forward,backward" "int asrgba" 1
Hider "raytrace" "string pixelfiltermode" "importance" # ...
We mention use of "normal Nn", however for hair we recommend substituting Tn "Hair Tangent" for the best results of Denoising hair.
In the above example we include "vector forward" and "vector backward" for completeness. These are only used (one or the other or both) for cross-frame denoising but not for a single frame. If only one exists, the Denoiser assumes the opposite vector for the missing direction. If neither exists, it will still operate but in a limited capacity.
The denoise utility expects a multichannel OpenEXR with the exact channel names given here. Channel names may be [Ci.r Ci.g Ci.b Ci.a] or [R G B A] as specified in the EXR. Light Path Expressions are used to separate the diffuse and specular components and to retrieve the unlit albedo colors for the materials. The statistics parameters are used to request that prman produce images that estimate the variance or the error in the linked image. The forward and backward channels are not strictly necessary here, but become useful when filtering image sequences with motion blur.
For the albedo, U2, or user lobe 2 is the default routing for albedo from the standard Pxr materials. The actual number is determined by the rendermn.ini file and can be changed to anything from 1 through 8 if your site uses custom shaders that assign LPE lobes differently.
/prman/lpe/user2 Albedo
Users can enable user lobes by changing the rendermn.ini to include:
/prman/lpe/enableuserlobes 0|1
Where 0 is off (default). This is an experimental option.
Note that the filter specified on Z and z.var should match the choice of PixelFilter used. Normally, Z channel output in RIS defaults to using the "min" filter instead of a pixel filter. However, the denoiser expects the Z channel to be pixel filtered just like any other channels.
The final key setting here is to turn on pixel filter importance sampling on the raytrace hider. Normally a sample through one pixel is shared among its neighbors and blended into all of the pixels covered by the filter region around the sample. This can be beneficial for getting quick feedback in IPR and letting images converge a little more quickly. However, the denoiser expects that each pixel is statistically independent from all others and that no samples are shared between pixels. If you forget to enable this option, the denoiser will usual produce overly splotchy images after filtering.
With all of these options set, you can now run the denoiser on the image produced by prman:
denoise image.exr
This will produce a new file, image_filtered.exr, with the filtered image. If you have multiple image files, you may pass them all on the command line and the denoiser will filter each file in turn.
Cross-Frame Filtering
For animation sequences, the denoiser can be set to a cross-frame filtering mode where the filtering for each frame also takes into account the pixels from the frames immediately before and after.
Using Maya
To enable this option in RfM, simply choose Cross-frame filtering from the denoising drop-down box instead of Frame and render your sequence.
Using Katana
The setup is very similar to single frame filtering except we use --crossframe -v variance with previous frame, current frame, and next frame in the renderSettings' scriptCommand:
`$RMANTREE/bin/denoise  --crossframe -v variance
image.'+str(int(frame)-1)+'.exr image.'+str(int(frame))+'.exr image.'+str(int(frame)+1)+".exr"
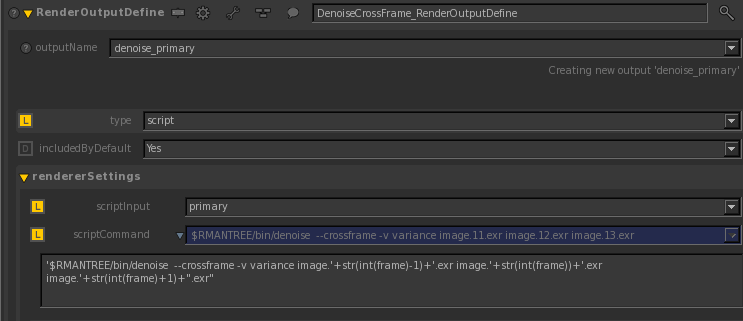
By default, it will write out <image>_filtered.#.exr. This can be changed by specifying -o. See denoise -help for more information on other denoise command options. Note that we can also run the denoise utility for AOVs with crossframe; see Layered Filtering below.
From RIB
If rendering straight from RIB, configure each frame the same as you would for basic rendering as above. For best results you will want to make sure that the motion vectors, forward and backward, are included this time. Then run the denoise utility with:
denoise --crossframe -v variance frame*.exr
The denoiser will process each frame in turn and write out a series of images. If the input files were frame00.exr through frame99.exr, the output will be in frame_filtered00.exr through frame_filtered99.exr
If you are using a render farm and would like to distribute the denoising work across the nodes, or you'd like to interleave rendering and denoising you can also do this, though the approach is slightly more complex:
prman frame01.rib
prman frame02.rib
prman frame03.rib
denoise --crossframe -v variance -L frame01.exr frame02.exr frame03.exr
prman frame04.rib
denoise --crossframe -v variance -F -L frame02.exr frame03.exr frame04.exr
prman frame05.rib
denoise --crossframe -v variance -F -L frame03.exr frame04.exr frame05.exr
...
prman frame98.rib
denoise --crossframe -v variance -F -L frame96.exr frame97.exr frame98.exr
prman frame99.rib
denoise --crossframe -v variance -F frame97.exr frame98.exr frame99.exr
The -F and -L options ask the denoiser to use the first and last of the given images, respectively, when doing cross-frame filtering but not to actually denoise those images themselves. Thus using -F and -L with frames 2, 3, and 4 will filter and write frame 3 only, though it will use frames 2 and 4 to do so. The first and last executions of denoise here are the exceptions in that they are set to filter two frames at a time. In any event, when run this way the denoiser will always be working one frame behind the rendering.
Layered Filtering (For AOVs)
In some cases, you may wish to denoise individual passes/AOVs, such as the diffuse contribution for a particular light group. Rather than duplicate the geometry channels into the images for each pass, it is possible to write them out once per frame and then combine them with the individual pass images. In order for this to work some fairly strict naming requirements must be met. The below names are required so that the denoise tool knows what the channel contains, it does not determine the contents by looking at them. This is why the naming convention must be followed:
- The master image that contains all of the common channels (configured as above for the basic denoising) must have a file name that ends in either _variance.exr or .variance.exr.
The pass images can be named anything else, but must have color channels named/prefixed as one of:
diffusespeculardirectdiffusedirectspeculardirectDiffusedirectSpecularindirectdiffuseindirectspecularindirectDiffuseindirectSpecular
These may be optionally suffixed with a matching suffix to distinguish the different passes for a frame (e.g.,
directdiffuse_11235_a_moose_once_bit_my_sister). Combined diffuse and specular components can also be placed in matching channels named emission (e.g.,directdiffuse_foo17plusdirectspecular_foo17indirectemission_foo17), in which case the denoiser will also produce the filtered summation. If the default prefixes in the list above do not suit you, you can edit them in thelayergroupssection of the installeddefault.filter.jsonfile for your pipeline naming. Make a backup of this file first.
Note that the number of files and their order must match. The denoise utility divides the non variance images by the number of variance images to determine how many sets there are.
For instance, in the example below, the number of files for diffuse_key and specular_key and their order are the same. The denoiser sees two sets: diffuse and specular.
$RMANTREE/bin/denoise --crossframe image_variance.{5,6,7}.exr diffuse_key.{5,6,7}.exr specular_key.{5,6,7}.exr
Once this is done, the images can be given to the denoiser. For best results, you will probably want to use an additional option to filter the layer independently.
Filter Layers Independently
For performance reasons, filter layers independently is "false" in the .json files. This is because the denoiser computes a single filter kernel from the *_variance.exr file and then applies this to all the AOVs. This saves memory and time but may not be quite as aggressive as you need. If you set this to "true" then it will compute a filter kernel for each AOV independently and apply it. This takes more time and memory. It may also mean that it violates your additive compositing between layers and you may have a (usually) slight image change. But since it's more tuned to each AOV layer, it may give you better results.
Example: Your diffuse is converged but your specular is quite noisy, filtering the specular independently may give you better results for the specular channel than if you used the filter kernel computed based on all the channels.
Using Katana
In Rfk, the setup is similar to the process for the beauty pass in addition to appending the AOVs in the renderSettings' scriptCommand. In this example, diffuse_key.#.exr is the diffuse AOV for the light group "key":
Single Frame
$RMANTREE/bin/denoise $INPUT diffuse_key.#.exr
Cross Frame
'$RMANTREE/bin/denoise  --crossframe '
    +' image_variance.'+str(int(frame)-1)+'.exr'
    +' image_variance.'+str(int(frame))+'.exr'
    +' image_variance.'+str(int(frame)+1)+'.exr'
    +' diffuse_key.'+str(int(frame)-1)+'.exr'
    +' diffuse_key.'+str(int(frame))+'.exr'
    +' diffuse_key.'+str(int(frame)+1)+'.exr'
From RIB
Single Frame
denoise master_variance.exr light0_dir.exr light1_indi.exr
Cross Frame
denoise --crossframe
        master_variance.1.exr master_variance.2.exr master_variance.3.exr
        light0_dir.1.exr light0_dir.2.exr light1_indi.1.exr light1_indi.2.exr