...
The number of threads to use for preview or IPR renders. A A value of 0 indicates that all processors will be used. Negative Negative values indicate all processors minus the specified number will be used. The The default of -2 allows the user interface to remain responsive during continuous rendering.
...
IPR Display
| Anchor | ||||
|---|---|---|---|---|
|
DisplayRender To
The display to use for IPR renders. Choose Choose "It" or Render View.
Output AOVs
Write out AOVs/LPE during interactive sessions. This is off by default to improve performance.
Prune Invisible Nodes
During IPR we only prune templated nodes, allowing other objects to be interactively hidden/unhidden. However, to save translation time you can tell RfM to also prune hidden nodes during IPR.
Batch Render
| Anchor | ||||
|---|---|---|---|---|
|
Chose between LocalQueue and Tractor. There There is a separate section below for Tractor queuing settings.
Spool
By default preview renders are spooled, which means that the render launches in Local Queue.
Spool To
Choose LocalQueue or Tractor
...
How many frames in a chunk/at a time in sequence on a remote server. The default is 5.
Checkpoint
Use checkpointing in a batch render, choosing the number of minutes or iterations before a checkpoint is written. You can control this option using the same syntax found in the Checkpointing Document under "How to Specify". You may specify anything from individual render increments to seconds, minutes, hours, and days. As well as specify an exit time after a checkpoint time or an exit alone without the checkpointing at a given time. The help text popup over the field provides examples, such as: 5m,1h says create a checkpoint every 5 minutes and exit at 1hour, writing the final result.
Launch Denoiser
If deselected, the denoise operation will not launch, you can run the denoiser tool after the image is written manually. Note the display driver in the render settings must be set for denoising.
Tractor
| Anchor | ||||
|---|---|---|---|---|
|
...
This affects how active jobs are assigned to remote servers. It It doesn't affect position in the dispatcher queue.
Service Keys
Additional service selectors for the job
Environment KeyEnv Keys
Switch between preset configurations. The JSON pref called DefaultEnvKey specifies DefaultEnvKey specifies the default value seen here. Multiple keys can be specified and should be space separated.
These environment keys are recognized by LocalQueue and Tractor:
- rfm-* (eg. rfm-22.0)
- maya-* (eg. maya-2017)
- rmantree=* (eg. rmantree=$RMANTREE)
- rfmtree=* (eg. rfmtree=$RFMTREE)
After
...
Example: /usr/sbin/Mail -s 'Job done: %j' %u < %f (%j = job title, %t = task title, %u = user, %f = temporary status file)
When Error
A command that should be executed if the job had an error
Example: /usr/sbin/Mail -s 'Job error: %j' %u < %f (%j = job title, %t = task title, %u = user, %f = temporary status file)
When Always
A command that should be executed regardless of job error status
Example: /usr/sbin/Mail -s 'Job error: %j' %u < %f (%j = job title, %t = task title, %u = user, %f = temporary status file)
Texture Manager
| Anchor | ||||
|---|---|---|---|---|
|
...
By default we write .tex files to the Images project directory. If this fails (it doesn't exist or there are permissions issues) use the specified folder here. Do not use spaces or diacritics in your path text.
Show Advanced Options
Show more options for .tex conversion
Texture Extensions
The recognized file type extensions for textures
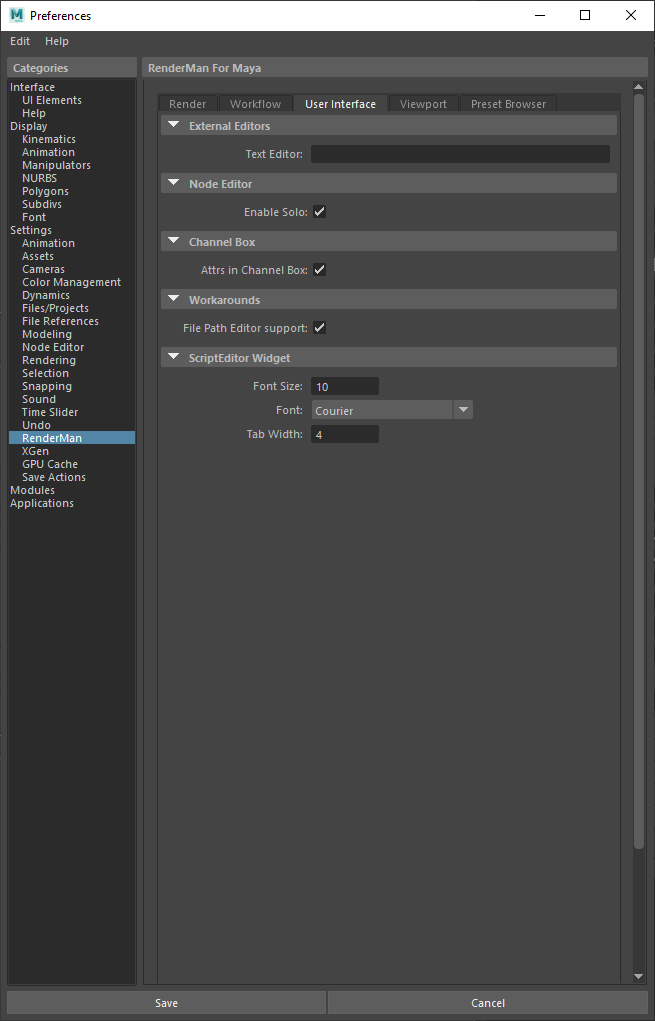
User Interface
| Anchor | ||||
|---|---|---|---|---|
|
Viewport
External Editors
Text Editor
Set the default editor for opening ASCII RIB files.
Node Editor
Enable Solo
Allows soloing selected nodes in the Node Editor as you would in the Hypershade by selecting the solo button.
Channel Box
Attributes in Channel box
Toggle whether or not the channel box displays RenderMan controls.
Script Editor Widget
Font Size
Change the size of displayed fonts.
Font (Typeface)
Change the font used in the editor.
Tab Width
When pressing Tab, move this many spaces in the editor.
Viewport
| Anchor | ||||
|---|---|---|---|---|
|
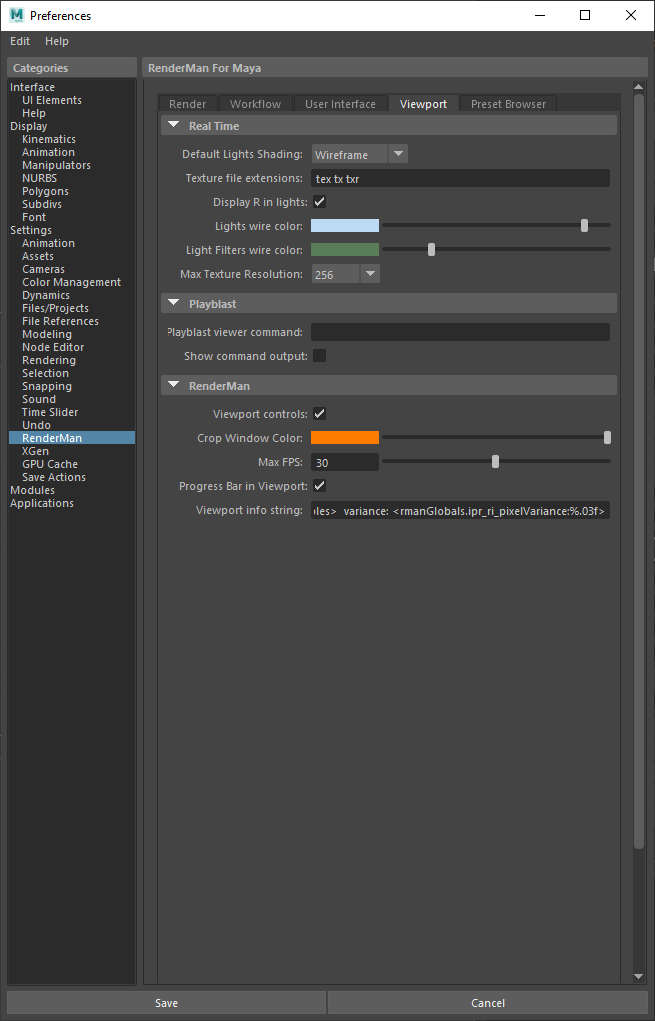
Real Time
Default Lights Shading
Default mode for light creation, wireframe or shaded.
Texture File Extensions
The extensions used to identify the displayed texure texture files. We default to RenderMan compliant types.
...
The maximum resolution of displayed textures in the Viewport. Higher resolutions will impact performance, especially if many are to be displayed. This does not affect IPR rendering to the Viewport.
Viewport Controls
Show the controls for rendering to VIewport 2.0 in the icon bar of the panel.
Script Editor Widget
Font Size
Change the size of displayed fonts.
Font (Typeface)
Change the font used in the editor.
Tab Width
Playblast
Playblast Viewer Command
Select an executable and use # to denote frame numbers and padding to pass along.
Show Command Output
Print the command into the script editor.
RenderMan
Viewport Controls
Display the RenderMan control icons in the viewport panel.
Crop Window Color
Select your preferred color for drawing a crop window.
Max FPS
Limit the frame rate to avoid some issues with lag or phantom mouse.
Progress Bar in Viewport
A small bar will show frame progress at the bottom of the viewport and be disabled here.
Viewport Info String
You can display useful information in the viewport, you can choose this based on selections here using the tokens provided from the Workspace Render Tab. The default is the maximum amount based on space to fit the outputWhen pressing Tab, move this many spaces in the editor.
Preset Browser
| Anchor | ||||
|---|---|---|---|---|
|
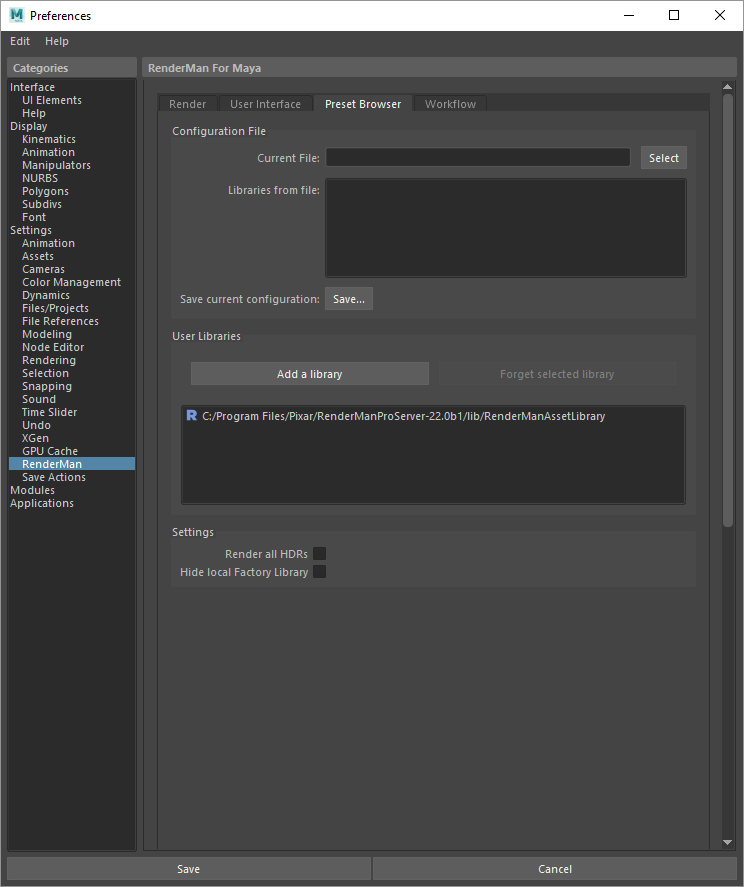
Asset Library
Change the location where the Preset Browser looks for assets.
Configuration File
Current File
This is a *.rac RenderMan Asset Configuration file formatted as a JSON file. It contains other library locations specified by the user or even other *.rac files
Libraries From File
This displays the loaded libraries from the above *.rac file
Save Current Configuration
Saves a *.rac RenderMan Asset Configuration file formatted as a JSON file containing the loaded library locations specified by the user
User Libraries
Add a Library
Add a new path to a library folder
Forget Selected Library
Remove a library from the choices
Render all HDRs
Render a daylight swatch along with the default cloudy swatch when exporting materials
Hide local Factory Library
Remove the default shipping library frome the browser choices
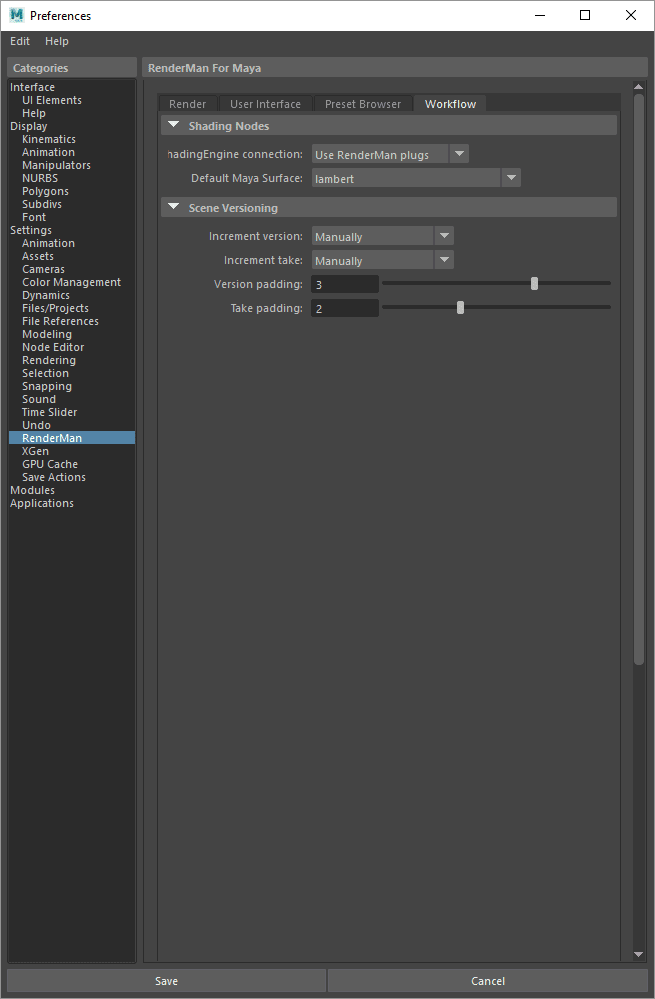
Workflow
| Anchor | ||||
|---|---|---|---|---|
|
...
Shading Nodes
Shading Engine Connection
Connect RenderMan nodes to the RenderMan plug (default) or Maya plug. Using the default RenderMan plug leaves Maya plugs unused and available for other in-Maya options (like Surface Shader and Displacement for example)
Default Maya Surface
When using the RenderMan plugs, create this type of Maya node to assigning by default. Typically Lambert.
Scene Versioning
Increment Version
Manually: User must select to save and increment the scene.
On Preview Render: Scene is automatically incremented each time it is preview rendered (not interactive renders)
On Batch Render: Scene is automatically incremented each time it is batch rendered
Increment Take
Manually: User must select to save a new take
On Preview Render: Scene take is incremented on a preview render (not interactive renders)
On Batch Render: Scene take is incremented on a batch render
Version Padding
The padding used to increment a scene, the default is 3 meaning versions will have three digits, example: 001
Take Padding
The padding used to increment the takes of a scene, the default is 2 meaning takes will have two digits, example: 01