Contents
Installation
RenderMan for Houdini (RfH) comes with your Houdini installation automatically! Since it is only an interface to the RenderMan Pro Server (the renderer itself), you need to also install the renderer. See Installation and Licensing.
After you installed RenderMan Pro Server properly and set up its environment variable $RMANTREE, re-launch Houdini. You are now ready to setup your first scene!
On OSX it may be useful to edit your Houdini.env file like so (being sure the path is the version you're using, below it is 21.0):
RMANTREE=/Applications/Pixar/RenderManProServer-21.0
PATH=$RMANTREE/bin:$PATH
Adding Light
To add a light, select one of light tools such as Dome ![]() from the RenderMan Shelf which automatically creates a Pxr light OBJ. See Lighting for more information.
from the RenderMan Shelf which automatically creates a Pxr light OBJ. See Lighting for more information.
Adding Material
To add a material, we need to first create a RIS Network. Note that RIS material is not a SHOP but It is a VOP inside a RIS Network. A RIS Network is just a container for RIS VOPs. It is required for Houdini to work with RIS materials. For simplicity, we recommend creating only one instance of RIS Network and include all your RIS VOP nodes in it. To add a material such as PxrSurface, you can select the Surface tool ![]() from the RenderMan Shelf which automatically creates a RIS Network if it does not exist and a PxrSurface VOP.
from the RenderMan Shelf which automatically creates a RIS Network if it does not exist and a PxrSurface VOP.
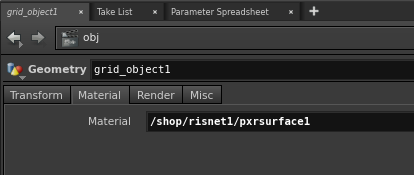
Assigning Material
To assign the material to your object, simply drag the Pxr VOP you just created to the Material parameter of your object.
Render
To render, add a RenderMan RIS ROP ![]() from the RenderMan Shelf. Press the Render to MPlay button to see your render interactive. See Rendering for more information.
from the RenderMan Shelf. Press the Render to MPlay button to see your render interactive. See Rendering for more information.